Rest API Testing: So testest du Rest APIs richtig!


 teilen")


Rest API Testing ist mit eine der wichtigsten Aufgaben beim Entwickeln von zuverlässigen und sicheren Rest APIs. Hier bekommst du eine komplette Übersicht was du alles beim Testen deiner Rest API beachten solltest.
Es gibt unzählige Wege eine Rest API zu testen. Das Vorgehen ist dabei z.B. abhängig von der Anwendung, der Programmiersprache und dem Entwicklerteam. Es gibt jedoch ein paar grundlegende Dinge die man immer beachten sollte. Und genau darum soll es in diesem Blogpost gehen.
Darum solltest du Rest API Tests durchführen
Eine API ist wie ein Vertrag zwischen einem Client und einem Server oder zwischen zwei Anwendungen. Vor dem Testen der Implementierung muss sichergestellt werden, dass der Vertrag korrekt ist, indem die Spezifikation (z.B. Swagger oder OpenAPI) überprüft wird. Für Rest APIs ist es wichtig, dass alle HTTP-REST Semantiken und Prinzipien eingehalten werden. Für öffentlich zugängliche APIs ist das umso wichtiger, damit nach Updates alle Funktionalitäten weiterhin gewährleistet werden können.
Sicherheitsüberprüfungen sind ein essenzieller Bestandteil des Testprozesses. Durch das Testen kannst du potenzielle Sicherheitslücken aufdecken und schließen, um deine Anwendung vor Angriffen zu schützen. Ein weiterer wichtiger Aspekt ist die Optimierung der Performance. Durch Tests kannst du die Antwortzeiten deiner API messen und sicherstellen, dass sie auch unter hoher Last schnell und zuverlässig bleibt. So können Engpässe und Performanceprobleme frühzeitig erkannt und behoben werden.
Nicht zuletzt ermöglicht das Testen die Integration deiner API in eine Continuous Integration and Deployment (CI/CD) Pipeline, wodurch Änderungen am Code automatisch überprüft und eine kontinuierliche Qualitätssicherung gewährleistet wird.
Auswahl der optimalen Testfälle
Bevor wir mit dem Schreiben der Tests beginnen können, möchte ich kurz erläutern, wie man die richtigen Testfälle auswählt. Das ist eigentlich die wichtigste Aufgabe. Sonst können wir hundert Tests schreiben, die alle keinen Mehrwert bringen. Besonders genau müssen wir uns über Randfälle Gedanken machen. Randfälle sind dabei Testeingaben, die am wahrscheinlichsten eine fehlerhafte Ausgabe oder sogar einen Programmfehler auslösen können.
Hinweis: Es gibt verschiedenste Arten von Tests, z.B. Integrationstests, Unit Tests oder funktionale Tests. In diesem Blogpost werden verschiedene Tests gezeigt, ich gehe aber nicht näher auf die Differenzierung der Testarten ein.
Um die Auswahl etwas anschaulicher zu gestalten habe ich mir ein Fallbeispiel ausgedacht. Das sind unsere Anforderungen:
- Wir wollen eine Funktion erstellen, um einen Benutzer zu registrieren (/sign-up Route)
- Benutzername, Passwort und Passwort Wiederholung sollen abgefragt werden
- Der Benutzername darf noch nicht vergeben sein
- Der Benutzer soll eine E-Mail zur Vervollständigung der Anmeldung bekommen (Double Opt-In)
Mit ein wenig logischem Nachdenken kommen uns dabei zu erst folgende Testfälle in den Sinn:
- Wurden alle Parameter (Benutzername, Passwort, Passwort Wiederholung) übergeben?
- Ist der Benutzername bereits in der Datenbank vorhanden?
- Wurde die Bestätigungs E-Mail verschickt?
Das ist alles korrekt, allerdings haben wir noch einige vergessen. Und das sind die sogenannten Randfälle:
- Stimmt die HTTP Request Methode?
- Wurden alle erforderlichen Parameter im richtigen Format übergeben?
- Stimmen Passwort und Passwort Wiederholung überein?
- Ist die Passwortlänge ausreichend?
- Konnte die Datenbankabfrage ohne Fehler ausgeführt werden?
- Werden die richtigen HTTP Status Codes in Fehlerfällen zurückgegeben?
- Ist der Benutzername nicht zu lang für das Datenbankfeld (z.B. wenn VARCHAR auf 255 Zeichen begrenzt ist)?
- Wurde ein gültiger Token für das Double Opt-In erstellt und erfolgreich in die Datenbank gespeichert?
- Sind die Eingaben XSS- und SQL-Injection-sicher?
Ziel ist es, die Anfrage mal aus einem anderen Blickwinkel zu betrachten, um möglichst alle Randfälle abzudecken. Ich hoffe, dass ich dich mit diesem Beispiel etwas dafür sensibilisieren kann.
Nimm dir Zeit für die Auswahl der Testfälle. Das ist wichtiger als die Tests zu schreiben. Wenn du das einmal richtig gemacht hast, sparst du dir in Zukunft viel Zeit.
Rest API Testing Tools
Für das Testen von Rest APIs gibt es zahlreiche Tools. Dabei gibt es Tools mit denen wir direkt HTTP Requests ausführen oder Tools mit denen wir Unit Tests schreiben können und dadurch unsere Rest API testen können. Das sind meine zwei favorisierten Wege:
- Postman: Postman ist ein weit verbreitetes Tool, das eine intuitive Benutzeroberfläche zum Testen und Debuggen von Rest APIs bietet. Mit Postman kannst du schnell und einfach API-Anfragen erstellen, testen und speichern. Es ist einfach zu bedienen und auch das Arbeiten mit mehreren Entwicklern an den gleichen Ressourcen funktioniert prima.
- Unit Testing: Ja, auch durch Unit Tests können Rest APIs getestet werden. Dabei werden die HTTP Requests ausgeführt und das Ergebnis validiert. Diese Methode erfordert zwar zunächst einen höheren Aufwand, bietet aber den Vorteil der vollständigen Integration in deinen Entwicklungsprozess und ermöglicht kontinuierliches Testen. Jede Programmiersprache hat da so seine eigenen Tools. Ich entwickle hauptsächlich mit JavaScript, so dass ich dir hier ein Beispiel aus der Praxis zeigen kann. Ich nutze Mocha und Chai als Testing-Frameworks. Bei jedem Test werden eine oder mehrere Requests an die entsprechenden Rest API Endpunkte geschickt und das Ergebnis validiert.
const chai = require('chai');
const chaiHttp = require('chai-http');
const server = require('../../index');
const should = chai.should();
require('dotenv').config();

chai.use(chaiHttp);

describe('## Entries - Test entry functionalities', () => {
  let token;
  let listId;

  // authenticate user before running tests
  before((done) => {
    // ...
  });

  it('should be able to create a new entry', (done) => {
    const entry = {
      name: 'Test entry',
    };

    chai
      .request(server)
      .post(`/api/${process.env.API_VERSION}/list/${listId}/entries`)
      .set('Authorization', `Bearer ${token}`)
      .send(entry)
      .end((err, res) => {
        res.should.have.status(201);
        res.should.be.json;
        res.body.should.have.property('id');
        res.body.should.have.property('listID');
        res.body.should.have.property('name');
        res.body.should.have.property('checked');

        const entry = res.body;

        // checked should be false by default
        entry.checked.should.equal(false);

        done();
      });
  });

  it("shouldn't be able to create a new entry if the list does not exist", (done) => {
    const entry = {
      name: 'Test entry',
    };
    const unrealisticListId = 9999999;

    chai
      .request(server)
      .post(`/api/${process.env.API_VERSION}/list/${unrealisticListId}/entries`)
      .set('Authorization', `Bearer ${token}`)
      .send(entry)
      .end((err, res) => {
        res.should.have.status(404);
        done();
      });
  });

  it("shouldn't be able to create a new entry if the name is not provided", (done) => {
    const entry = {};

    chai
      .request(server)
      .post(`/api/${process.env.API_VERSION}/list/${listId}/entries`)
      .set('Authorization', `Bearer ${token}`)
      .send(entry)
      .end((err, res) => {
        res.should.have.status(400);
        res.text.should.eql('Missing name property');

        done();
      });
  });

  it('should be able to get all entries for a list', (done) => {
    chai
      .request(server)
      .get(`/api/${process.env.API_VERSION}/list/${listId}/entries`)
      .set('Authorization', `Bearer ${token}`)
      .end((err, res) => {
        res.should.have.status(200);
        res.should.be.json;
        res.body.should.be.a('array');

        done();
      });
  });

  it("shouldn't be able to get all entries for a list if the list does not exist", (done) => {
    const unrealisticListId = 9999999;

    chai
      .request(server)
      .get(`/api/${process.env.API_VERSION}/list/${unrealisticListId}/entries`)
      .set('Authorization', `Bearer ${token}`)
      .end((err, res) => {
        res.should.have.status(404);
        res.text.should.eql('List not found');
        done();
      });
  });

  it('should be able to update the properties of an entry', (done) => {
    let entry = {
      name: 'Default name',
      checked: false,
    };

    // create a new entry
    chai
      .request(server)
      .post(`/api/${process.env.API_VERSION}/list/${listId}/entries`)
      .set('Authorization', `Bearer ${token}`)
      .send(entry)
      .end((err, res) => {
        res.should.have.status(201);

        const createdEntryId = res.body.id;

        // update the entry
        let changedName = 'Changed entry name';
        entry.name = changedName;
        entry.checked = true;
        entry.priority = 99;

        // send the patch request
        chai
          .request(server)
          .patch(
            `/api/${process.env.API_VERSION}/list/entries/${createdEntryId}`
          )
          .set('Authorization', `Bearer ${token}`)
          .send(entry)
          .end((err, res) => {
            res.should.have.status(200);
            res.should.be.json;

            // check if the name has changed
            res.body.name.should.equal(changedName);

            // check if the checked state has changed
            res.body.checked.should.equal(true);

            // check if the priority has changed
            res.body.priority.should.equal(99);

            // delete the entry
            chai
              .request(server)
              .delete(
                `/api/${process.env.API_VERSION}/list/entries/${createdEntryId}`
              )
              .set('Authorization', `Bearer ${token}`)
              .end((err, res) => {
                res.should.have.status(200);
                done();
              });
          });
      });
  });
[...]
In anderen Programmiersprachen gibt es ähnliche Tools. Hier noch ein paar weitere gängige Rest API Testing Tools:
- JUnit: Ein beliebtes Framework zum Testen von Java-Anwendungen. Es eignet sich hervorragend für die Erstellung von Unit-Tests für Rest-APIs in Java.
- RestAssured: Ein DSL-basiertes Java-Tool, das speziell für das Testen von Rest APIs entwickelt wurde. Es bietet eine einfache und ausdrucksstarke Syntax zur Validierung von API-Anfragen und -Antworten.
- PyTest: Ein bekanntes Python Framework zum Schreiben von Unit-Tests in Python.
Rest API Tests in Postman
Postman ist eines meiner Lieblingstools zum Testen von Rest APIs. Daher möchte ich dir dazu etwas genauer zeigen wie du Tests anlegen kannst.
Requests in Postman organisieren
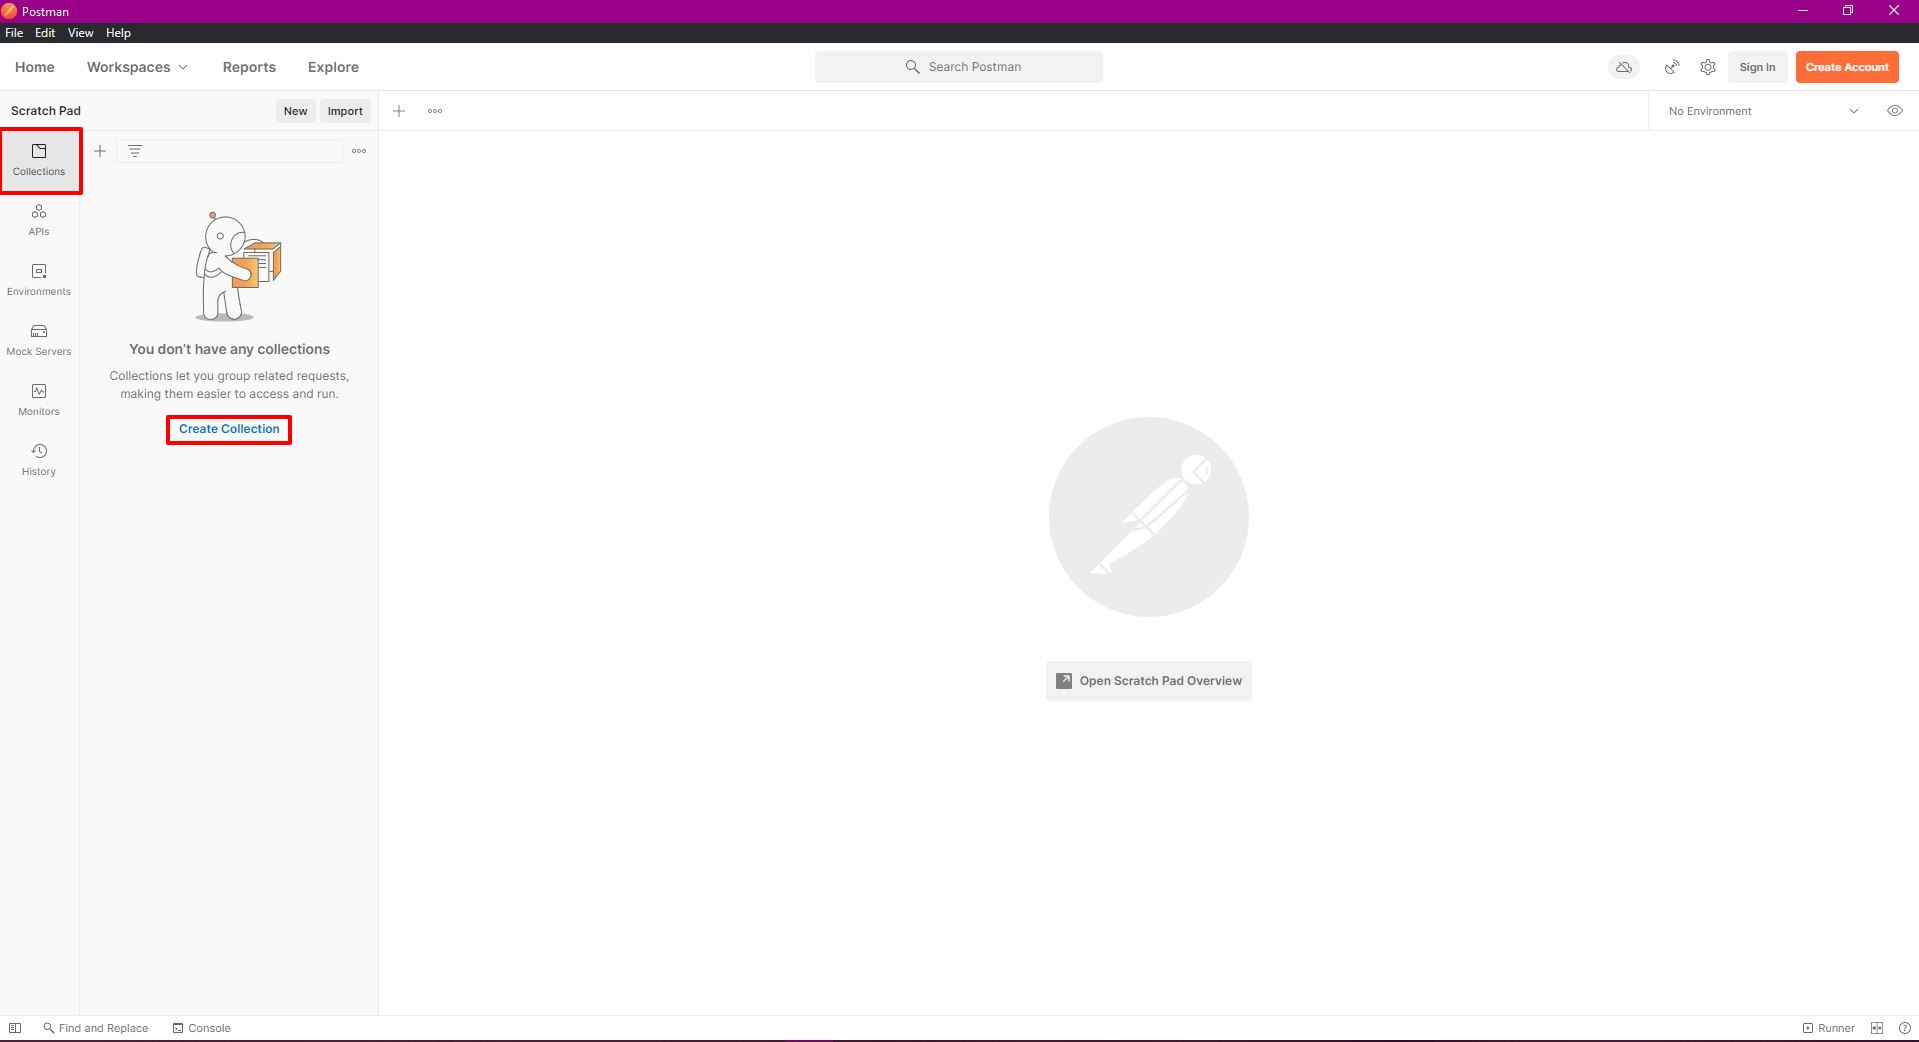
Wenn du Postman installiert hast, erwartet Dich diese Oberfläche. Du solltest dir für jedes Projekt/jede Rest API eine eigene Collection erstellen. Die ist wie ein Ordner in dem du deine einzelnen Requests organisieren kannst. Außerdem kannst du dann mit einem einzigen Klick die Tests für alle darin enthaltenen Requests ausführen.
Pro Collection können wir dann beliebig viele Requests anlegen. Die wichtigsten Einstellungen habe ich mal rot markiert.

Zum einen sollten wir unserem Request einen Namen geben, um ihn schnell wieder zu erkennen („Login“ in diesem Fall). Dieser erscheint auch links im Collection Menü.
Als nächstes können wir für jeden Request die entsprechende HTTP Request Methode einstellen und die genaue URL der zu prüfenden Rest API Route angeben.
Tipp: Wiederkehrende Daten wie die Base-URL (http://localhost:3000) solltest du als Variablen anlegen.
Ganz rechts findest du den „Send“ Button, um eine Anfrage direkt zu senden.
Body Daten übergeben
In vielen Fällen wollen wir Daten an die Rest API senden. Das können wir entweder über den Reiter „Params“ machen. Diese werden dann entsprechend der HTTP Request Methode an den Server übermittelt oder wir nutzen den „Body“ Tab, um Daten in anderen Datenformaten zu übertragen.
Im Web wird gern auf JSON gesetzt, da es sehr flexibel einsetzbar ist und man sicher komplexe Datenstrukturen übertragen kann. Wichtig ist dabei, dass du über dem Textfeld „raw“ auswählst und dann rechts daneben das Format „JSON“ auswählst. Sonst werden die Daten eventuell nicht korrekt übertragen.
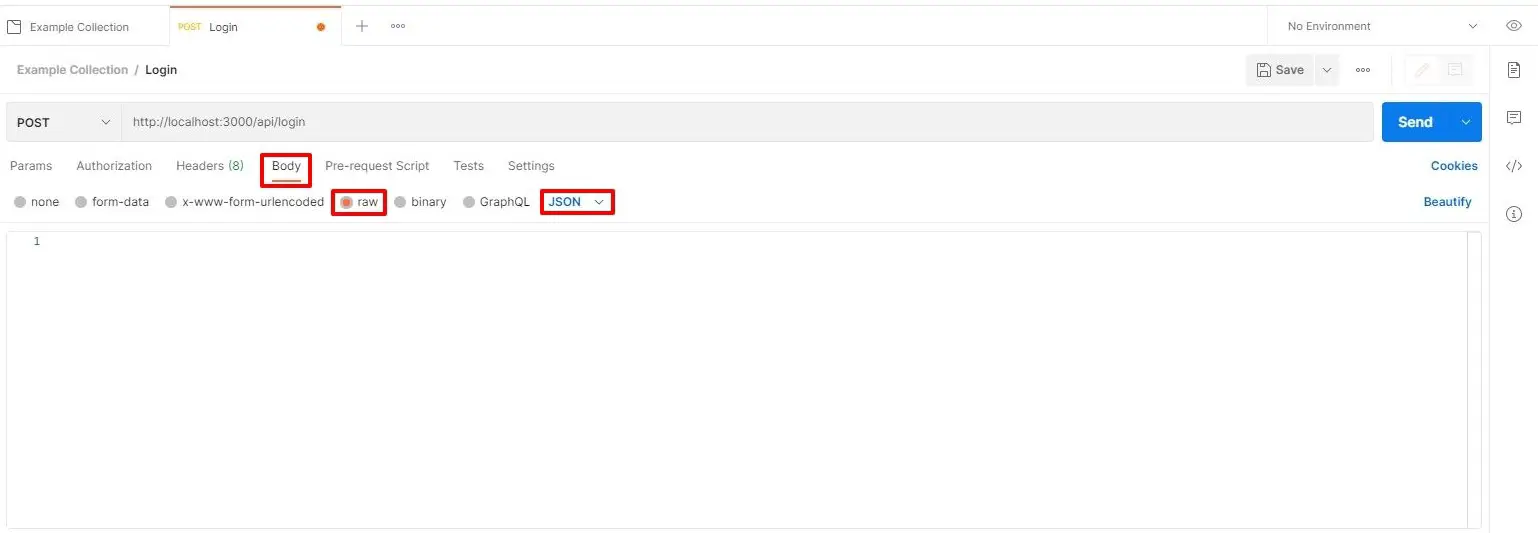
In das große Textfeld können nun die Daten im JSON-Format übergeben werden.
Das kann beispielhaft so aussehen. Postman zeigt dir Fehler in der JSON Struktur direkt an. Genauer kannst du es aber mit diesem JSON-Validator testen.
{
"username": "webdeasy.de",
"password": "f00b4r",
"password_repeat": "foob4r"
}
Ob du URL-Parameter oder Body Daten verwendet hängt ganz von der Umsetzung deiner Rest API ab. So greifst du jeweils in Node.js darauf zu:
router.post('/sign-up', (req, res, next) => {
	// body data
	console.log(req.body.YOURDATA);

	// url parameters
	console.log(req.params.YOURPARAM)
});
Authorization Keys einfügen
Falls du einen Login mit Bearer Token umgesetzt hast, kannst du diesen im Reiter „Authorization“ übergeben. Wähle dazu „Bearer Token“ aus und gebe ihn rechts unter „Token“ ein.

Bei anderen Authentifizierungsmethoden kannst du die passende unter „Type“ auswählen.
Tipp: Unter dem Menüpunkt „History“ findest du deine letzten Abfragen.
Testfälle in Postman programmieren
Die einzelnen Routen haben wir eingetragen und sauber strukturiert. Du kannst sie jetzt schon über den „Send“ Button ausführen und testen. Dabei musst du aber immer nach allen Ergebnissen manuell schauen. Einfacher ist es, wenn ein Skript die Aufgabe für uns übernimmt. Das können wir unter dem Reiter „Tests“ machen.
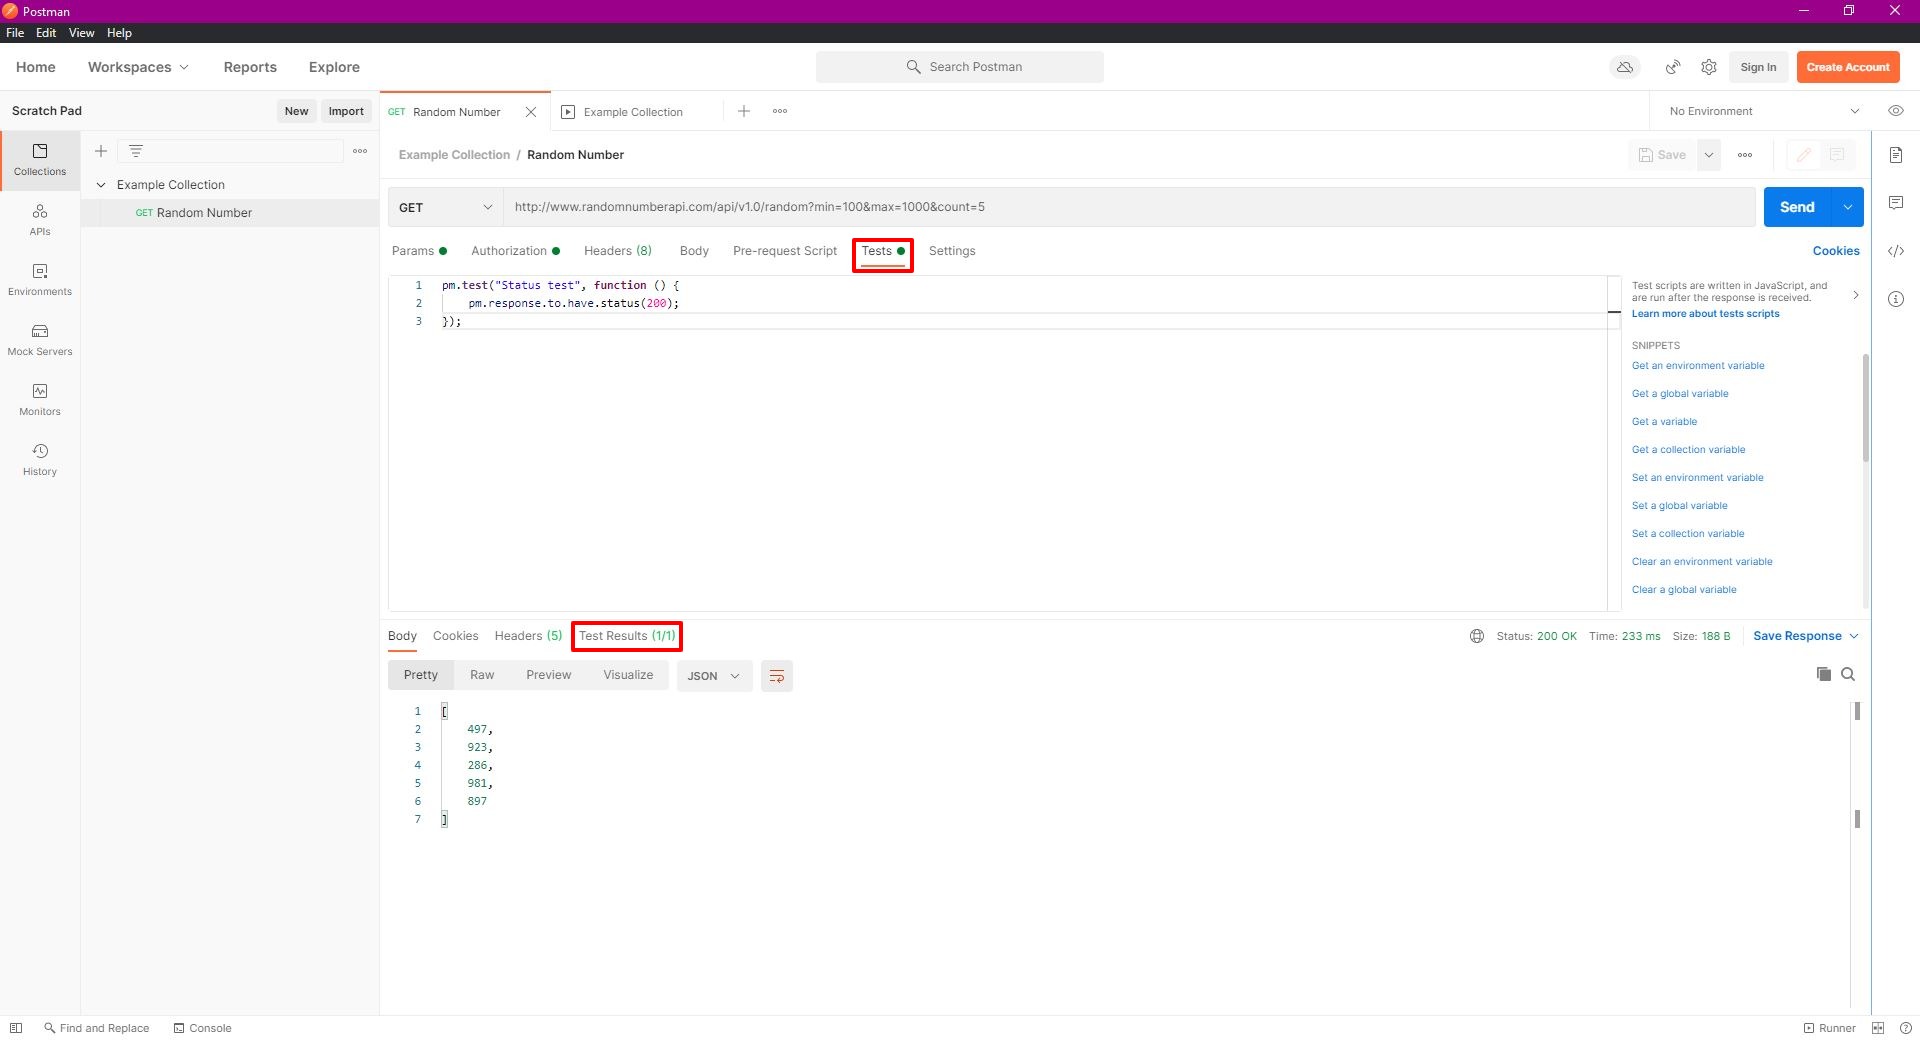
Hier hast du die Möglichkeit Deine Testfälle zu programmieren, das ist auch einfacher als es im ersten Moment klingt.
Das Abfragen des korrekten Status Codes können wir über folgenden Code realisieren:
pm.test("Status test", function () {
    pm.response.to.have.status(200);
});
So einfach kann es sein. Was du auch oft benötigen wirst ist die Abfrage einer Response Header Variable. Hier prüfe ich, ob es sich bei der Response um ein Bild vom Typ „jpeg“ handelt:
pm.test("Content-Type is image/jpeg", function () {
   pm.response.to.have.header("Content-Type");
   pm.response.to.be.header("Content-Type", "image/jpeg");
});
Tipp: Am rechten Rand unter „Snippets“ kannst du dir per Klick schon vorgefertigte Tests einfügen lassen.
Eine ausführlichere Dokumentation zum Erstellen der Testfälle gibt es direkt bei learning.postman.com.
Tests automatisiert ausführen
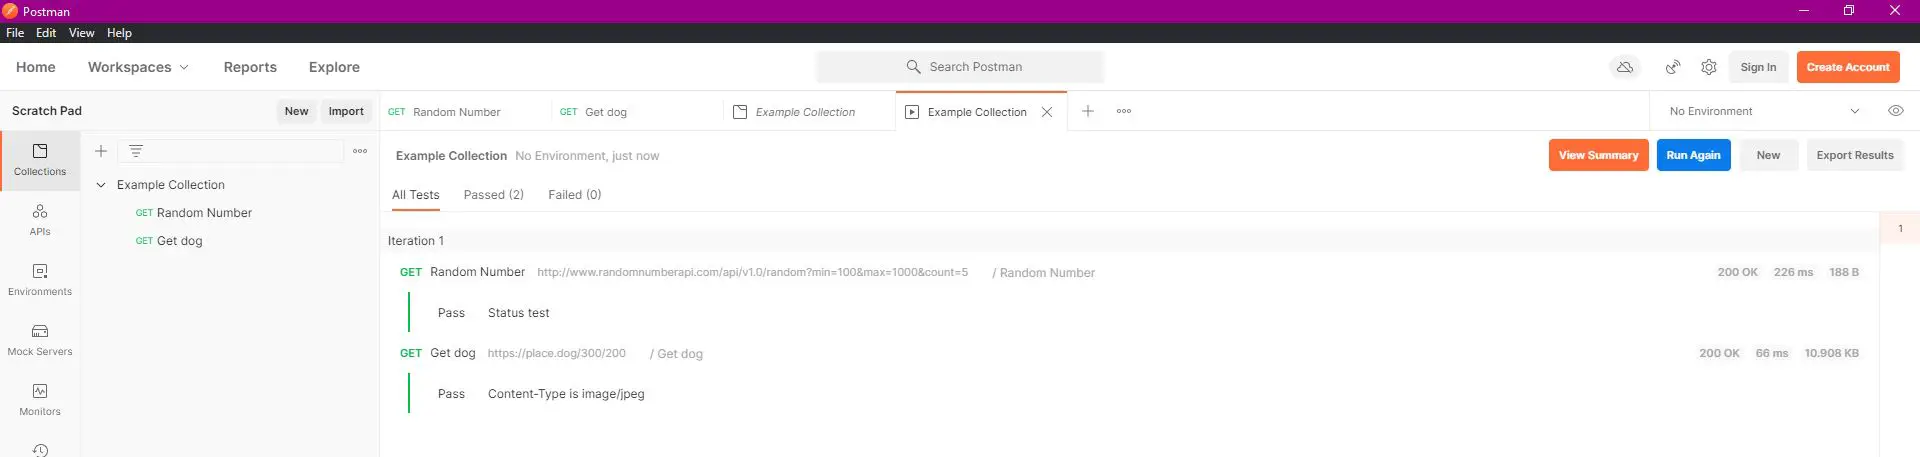
Unsere Testfälle haben wir manuell erstellt. Um uns aber etwas Zeit zu sparen, können wir alle Tests in einer Collection zusammen ausführen. Dazu wählst du die Collection aus und klickst auf „Run“. Dort kannst du dann noch die Anzahl der Iterationen (Ausführungen) und weitere Punkte einstellen.
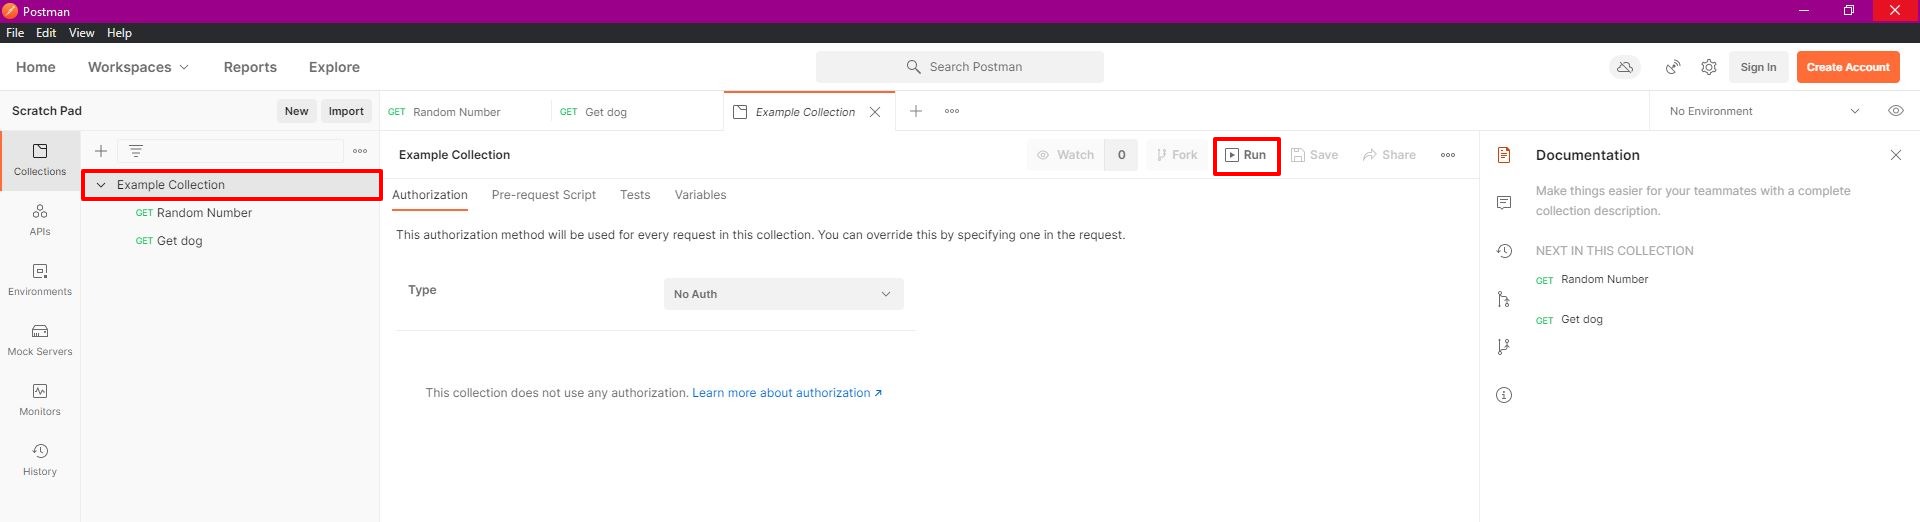
Im Anschluss erhältst du ein genaues Testprotokoll und kannst Fehler im Code direkt beheben und den Test erneut ausführen.
Automatische Rest API Tests in CI/CD Pipeline
Es ist eine gute und gern gesehene Praxis Test direkt einer CI/CD Pipeline auszuführen. Dadurch werden viele Fehler direkt beim Einchecken vom Code im Repo gesehen und können behoben werden. Im besten Fall bevor alles nach Production deployed wird.
Der folgende Code ist ein Auszug aus einer GitHub Actions Workflow File, bei dem Tests eines Node.js Backends ausgeführt werden.
name: Execute Unit Tests

on:
  push:
    branches: [ "develop" ]

jobs:
  test:

    runs-on: ubuntu-latest

    strategy:
      matrix:
        node-version: [20.x]

    steps:
    - uses: actions/checkout@v3

    - name: Use Node.js ${{ matrix.node-version }}
      uses: actions/setup-node@v3
      with:
        node-version: ${{ matrix.node-version }}
        cache: 'npm'

    - name: Install dependencies and run tests
      run: |
        npm install
        npm run test
      env:
        CI: true # set environment variable to run tests in CI mode
Cool, oder? Ich habe einen ausführlichen Blogpost erstellt, in dem ich einfach erkläre, wie man CI/CD Pipelines mit GitHub Actions erstellt.
Rest API Testing: Zusammenfassung
Das Testen von Rest APIs ist ein wichtiger Schritt, um die Qualität und Performance der Anwendung sicherzustellen. Durch eine sorgfältige Auswahl der Testfälle und den Einsatz verschiedener Testmethoden können potenzielle Probleme frühzeitig erkannt und behoben werden. Die Integration in deine CI/CD-Pipeline ermöglicht eine kontinuierliche Überprüfung, während die Einhaltung der API-Spezifikation die Vertragskonformität sicherstellt.
Wie fandest du diesen Beitrag?
Wichtiges am Rande der einzigste Unterschied zwischen Post und Put ist, das Put idempotent ist
Guter Hinweis! 🙂