Double Opt-In in Node.js: Sending User Confirmation Emails


")


The double opt-in procedure has established itself as the standard for all types of registrations on the Internet in recent years. I will show you here what exactly is behind it and how you can integrate Double Opt-In into your Node.js application.
With the double opt-in procedure, in addition to the registration in a form, e.g. on a website, an activation link is also sent by e-mail and only after its confirmation is the registration process completed or the registration verified.
Classical areas of application are for example:
- Newsletter subscriptions and unsubscriptions,
- lottery registrations, or
- Login Systems
In this tutorial we will build a Double Opt-In procedure into an existing RestAPI of a Node.js login system. I have already shown in another tutorial how we can create a RestAPI with Node.js and connect it to our frontend, e.g. Vue.js.
If you already have a finished system and only want to extend the Double Opt-In procedure, you can read on. Otherwise I recommend you first have a look at the linked tutorial.
If you are not yet familiar with Node.js, you can first take a look at the basics of Node.js.
{{TABLE_OF_CONTENTS}}
1. Advantages of Double Opt-In
Besides the normal Single Opt-In procedure, where you simply sign up for something – without further confirmation – there is also the better Double Opt-In procedure. The following diagram should explain the difference in the registration process:
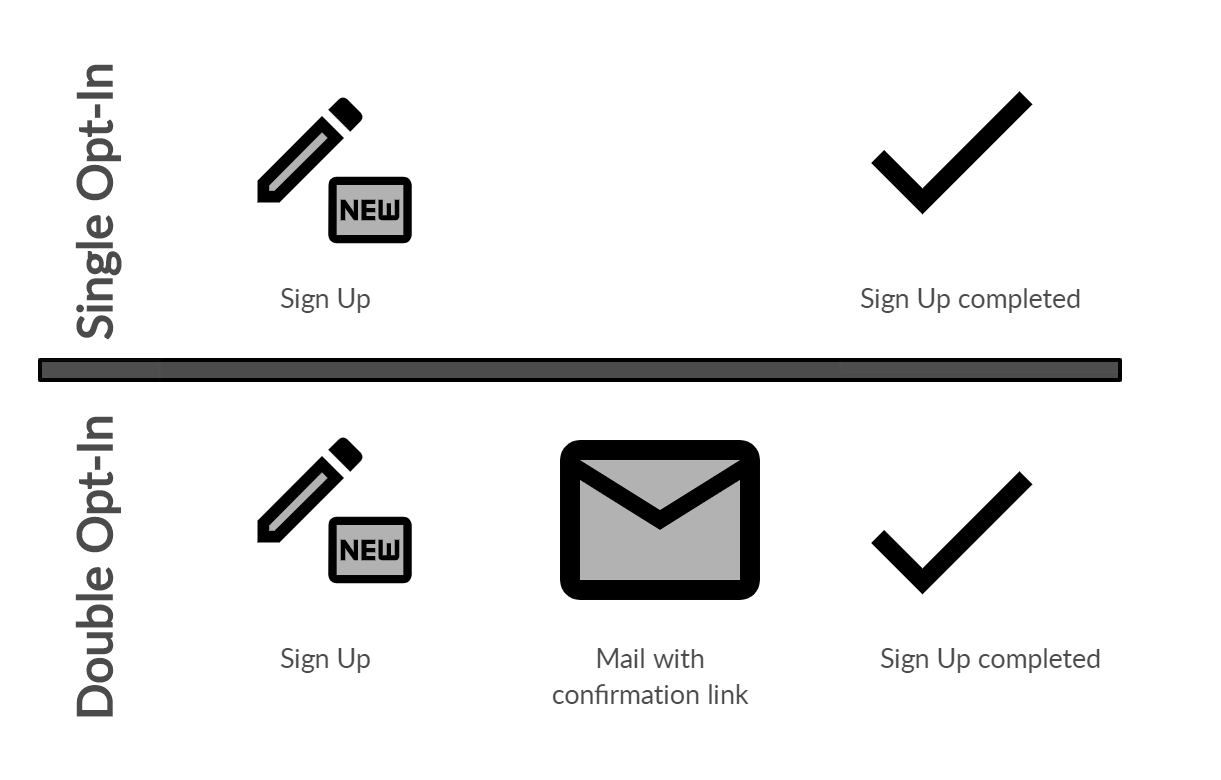
The Double Opt-In has many advantages and is now an established standard for any web application, app, etc.
The most important fact is that all confirmed registrations are genuine (verified). This means that bots can sign up in the form, but the account will never be verified, because the bots cannot click on the verification links in the confirmation emails.
Furthermore, it is probably advantageous from a data protection point of view, since the user explicitly agrees to a registration. Especially in EU countries it may be required by the DSGVO in some cases.
But attention: I cannot give a professional opinion on legal issues!
Now we start directly and send some confirmation emails (with the help of nodemailer) with activation links, have fun! 🙂
2. Install dependencies
So the first step is to install the required packages:
| Package | Description |
|---|---|
| nodemailer | To send the confirmation emails |
| email-validator | Validates entered e-mail addresses |
We can install these packages with the following command:
npm install nodemailer email-validator
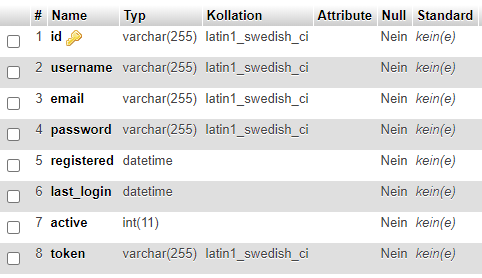
3. Adjust MySQL database structure
We now extend our existing users table by three more columns:
| Column name | Usage |
|---|---|
| email (varchar) | E-mail address of the user |
| token (varchar) | One-time token to generate the activation links |
| active (int) | Status of the entry (0 = not verified, 1 = verified) |
The complete MySQL table now looks like this:
Here again the hint: This tutorial is based on another tutorial from me: Node.js Login System with Express, JWT and MySQL (RestAPI)
4. Adjust Registration (/sign-up) and Login (/login) routes
To fill in the new columns, we adjust our existing registration route (/sign-up) and login route (/route) a bit.
To do this, we add the highlighted lines or adjust them accordingly.
The SQL query is changed here so that our new values, i.e. the e-mail address, the token and the account status (active) are entered into the database. As token we use a unique ID from the uuid package as well as for the user ID.
From line 40 we call the function sendOptInMail() from the mailer. We implement the function in step 8.
// routes/router.js

router.post("/sign-up", userMiddleware.validateRegister, (req, res, next) => {
	db.query(
		`SELECT * FROM users WHERE LOWER(username) = LOWER(${db.escape(
			req.body.username
		)}) OR LOWER(email) = LOWER(${db.escape(req.body.email)});`,
		(err, result) => {
			if (result.length) {
				return res.status(409).send({
					msg: "This username or email is already in use!",
				});
			} else {
				// username is available
				bcrypt.hash(req.body.password, 10, (err, hash) => {
					if (err) {
						return res.status(500).send({
							msg: err,
						});
					} else {
						let email = req.body.email;
						let userID = uuid.v4();
						let token = uuid.v4();

						// has hashed pw => add to database
						db.query(
							`INSERT INTO users (id, username, email, password, registered, active, token) VALUES ('${userID}', ${db.escape(
								req.body.username
							)}, '${email}', ${db.escape(
								hash
							)}, now(), 0, '${token}')`,
							async (err, result) => {
								if (err) {
									throw err;
									return res.status(400).send({
										msg: err,
									});
								}

								await mailer.sendOptInMail(
									email,
									userID,
									token
								);

								return res.status(201).send({
									msg: "Registered!",
								});
							}
						);
					}
				});
			}
		}
	);
});
To call sendOptInMail() we have to include mailer. For this you can simply create the file already, content will come – as said – immediately.
// routes/router.js

[...]
const mailer = require("../lib/mailer.js");
[...]
5. Validate e-mail address
To verify the entered e-mail address, we extend our middleware in users.js with the highlighted lines.
There it is checked whether a value named email was passed in the body of our request and whether it is a valid email address. If not, an error message is returned. Otherwise the route will be executed with next() at the end.
To validate the email we use the email-validator package. You can also do this with your own regular expression, but for simplicity we use an external module here.
// middleware/users.js

validateRegister: (req, res, next) => {
		// username min length 3
		if (!req.body.username || req.body.username.length < 3) {
			return res.status(400).send({
				msg: "Please enter a username with min. 3 chars",
			});
		}

		// valide email
		if (!req.body.email || !validator.validate(req.body.email)) {
			return res.status(400).send({
				msg: "Please enter a valid email address",
			});
		}

		// password min 6 chars
		if (!req.body.password || req.body.password.length < 6) {
			return res.status(400).send({
				msg: "Please enter a password with min. 6 chars",
			});
		}

		// password (repeat) does not match
		if (
			!req.body.password_repeat ||
			req.body.password != req.body.password_repeat
		) {
			return res.status(400).send({
				msg: "Both passwords must match",
			});
		}

		next();
	},
6. Check account activation at login
In the /login route you can add this query, so that you can’t login if the account hasn’t been confirmed yet. In my case the query is after checking if a corresponding database entry exists. From line 20 of the /login route, if you want to orientate yourself at my other tutorial.
// routes/router.js

[...]
if (!result[0]["active"]) {
  return res.status(401).send({
    msg: "Your account is not activated!",
  });
}
[...]
If you have already extended the system with your own function, you should add this query in other relevant places, e.g. in a forget-password function.
7. Create verification route (/verify)
With the verification route we can activate a registered account. We will send the link in the last step by mail. The link consists of the user ID and the unique token.
To do this, we create a new route that reads the user from the database using the user ID. First we check if the entry exists at all and return an error message if necessary.
From line 25 we check if the account is already activated and from line 32 we check the token.
If all checks are correct, we set the user account active (from line 39) and return a success message with status code 200.
// routes/router.js

router.get("/verify/:userID/:token", (req, res, next) => {
	let userID = req.params.userID;
	let token = req.params.token;

	db.query(
		`SELECT * FROM users WHERE id = ${db.escape(userID)}`,
		(err, result) => {
			// user does not exists
			if (err) {
				throw err;
				return res.status(400).send({
					msg: err,
				});
			}

			// no result from database
			if (!result.length) {
				return res.status(409).send({
					msg: "The requested parameters are incorrect!",
				});
			}

			// already activated
			if (result[0]["active"]) {
				return res.status(409).send({
					msg: "Account is already activated!",
				});
			}

			// wrong activation token
			if (result[0]["token"] !== token) {
				return res.status(401).send({
					msg: "The requested parameters are incorrect!",
				});
			}

			// set account active
			db.query(
				`UPDATE users SET active = 1 WHERE id = '${userID}'`,
				(err, result) => {
					if (err) {
						throw err;
						return res.status(400).send({
							msg: err,
						});
					}

					return res.status(200).send({
						msg: "Account activated",
					});
				}
			);
		}
	);
});
8. Send confirmation mail
The confirmation mail contains a verification link, when called the account should be confirmed, i.e. activated. We assemble the link ourselves and send it with the nodemailer package.
For this we can create a mailer.js in the folder lib and include the nodemailer.
Now we set up the nodemailer to send mails via our mailserver. This is done with the createTransport() function from line 5 to 16.
You should declare the access data to the mail server as environment variables of Node.js (process.env.*), so that no sensitive data is directly in the source code and you can easily adapt the data on different development and production stages.
// lib/mailer.js

const nodemailer = require("nodemailer");

let transporter = nodemailer.createTransport({
	host: process.env.MAIL_HOST,
	port: 465,
	secure: true,
	auth: {
		user: process.env.MAIL_USER,
		pass: process.env.MAIL_PASSWORD,
	},
	tls: {
		rejectUnauthorized: false,
	},
});
Now we create the asynchronous function sendOptInMail(). We build the activation link from the user ID and the token, as we defined it in the /verify route.
For the e-mail we specify some parameters:
- from: Sender’s address
- to: Recipient address
- subject: Subject
- text: Text content of the e-mail (if the mail client does not support HTML)
- html: HTML content of the e-mail
The most important thing is that we embed the activation link in the email so that the user can use it to activate their account.
// lib/mailer.js

module.exports = {
	async sendOptInMail(email, userID, token) {
		let activationLink = `${process.env.BASE_URL}api/verify/${userID}/${token}`;

		let mail = {
			from: process.env.SENDER_MAIL,
			to: email,
			subject: "Please active your account",
			text: `To activate your account, please click this link: ${activationLink}`,
			html: `<p>To activate your account, please click this link: <a href="${activationLink}">${activationLink}</a></p>`,
		};

		await transporter.sendMail(mail);
	},
};
At the end the configured e-mail is sent via transporter.sendMail(mail);.
9. Test Double Opt-In
All ready! Now you can test your RestAPI (Instruction is here). Also try if you can’t register again, if you can’t log in if the account is not confirmed and if the confirmation link works.
If everything works out: Congratulations & happy coding! 🙂
Hi,I got error ReferenceError: validator is not defined
You need to add this line to middleware/users.js:
const validator = require(“email-validator”);
Thanks for this great tutorial. I’m new in development, how can you integrate this in a framework like vuejs ?
Hey, check out this tutorial: https://webdeasy.de/en/complete-login-system-with-node-js-vue-js-vuex-part-2-2/
There I show how to implement a login system in Vue.js. The route-handling is the same that you need with the Double Opt-In.
Greetings
LH
Thanks for your response.
Hey, i’m looking for your tutorial but how can i create a vue component to give a confirmation message to user when my backend is on port 3000 and my frontend in port 8000. Google is not friend with this request
You can work with this two tutorials:
I hope this helps!