Node.js Login System (with Express, JWT & MySQL)


")


In this tutorial we will build a Node.js login system with all basic functions. For this we use Express, MySQL and JWT .
We build a complete login system in Node.js, which you can easily integrate into any frontend (React, Angular, Vue.js, …). This is possible because we implement the complete Node.js login system as a Rest API.
This blog post is part 1 of my two-part tutorial series. In part 2 (linked at the end) we will build the matching frontend together.
As a bonus, I will provide you with the complete code in a Git repository! 🙂
This is what you will learn in this tutorial:
- Create a Node.js project and install all required NPM packages.
- Designing a meaningful Node.js backend structure.
- Establish a database connection and perform operations on the MySQL database.
- Implement multiple routes with POST and GET in Node.js and Express.
- Create and validate sessions with JWT to check if a user is logged in.
Which components do we need for our Node.js login system?
We use a MySQL database in which our user data is stored. Alternatively, you can also replace the database with a MongoDB database, for example. We then have to query this data for authentication and can open a session for the user using the JWT (JSON Web Token) package. We use the Express Framework to implement the Rest API.
The tutorial is also available in video form here:
1. Set up Node.js project and install NPM packages
After you have initialised a new project with npm init, we can install the required dependencies. We need the following modules:
| Package | Description |
|---|---|
| express | We use this to create our own web server for our Rest API |
| mysql2 | To read/write in our database |
| uuid | To create IDs for future users |
| bcryptjs (Achtung: nicht bcrypt) | To hash the passwords |
| jsonwebtoken | Handling the user sessions |
| cors | So that we can call the Rest API from our website |
| dotenv | Managing of environment variables |
We install these modules using the following CLI command:
npm install express mysql2 uuid bcryptjs jsonwebtoken cors dotenv
To give you a better overview of where to store which files, here is a brief overview:
├── lib
│   └── db.js
├── middleware
│   └── users.js
├── routes
│   └── router.js
├── .env
└── index.js
2. Set up MySQL database
To store the user data, i.e. user name, password, etc. in our Node.js login system, we need a database – in our case MySQL. I use XAMPP as the database engine so that I can host my own database locally. Of course, you can also use any other (remote) database or start a local database with Docker.
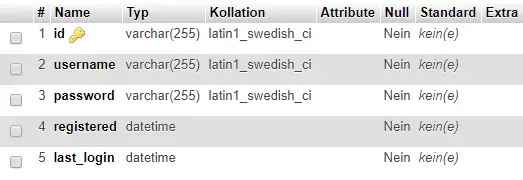
For our login system we only need a table according to the following scheme:

We use the ‘id’ attribute as the primary key and activate the auto-increment function.
Our table then looks like this in the database:
So that we can retrieve data in Node.js from our database, we create a separate file that we later integrate into our Express Router.
// lib/db.js

const mysql = require('mysql2');

const connection = mysql.createConnection({
  host: process.env.DB_HOST,
  user: process.env.DB_USER,
  database: process.env.DB_NAME,
  password: process.env.DB_PASSWORD,
});

connection.connect();
module.exports = connection;
You should never store security-relevant information such as passwords, PINs or tokens directly in the code! This is why environment variables are created for such data. These are variables that can be configured differently in the various stages of your application and are never stored in a repository.
To fill these placeholders with the correct content, we create the .env file. Note the point at the beginning. We create our four variables there:
DB_HOST=localhost
DB_USER=root
DB_PASSWORD=******
DB_NAME=node-login-tutorial
If you manage your code in a repository, you should definitely add the .env file to your .gitignore.
3. Set up Express and create routes
Our starter file is index.js and contains the start of our web server and the integration of the routes that we define in the routes/router.js file.
// index.js

const express = require('express');
const app = express();
const cors = require('cors');

require('dotenv').config();
const PORT = process.env.PORT || 3000;

app.use(express.json());
app.use(cors());

const router = require('./routes/router.js');
app.use('/api', router);

app.listen(PORT, () => console.log(`Server running on port ${PORT}`));
This is our main file, so let’s go through what happens here line by line.
| Line | Description |
|---|---|
| Line 3 | Imports the express module |
| Line 4 | Creates an instance of the Express application |
| Line 5 | Importiert das cors Modul |
| Line 7 | Loads environment variables from the .env file |
| Line 8 | Sets the port to the value defined in the environment variable or to 3000 if this is not defined |
| Line 10 | Configures the application to parse JSON-formatted requests |
| Line 11 | Activates CORS for the application |
| Line 13-14 | Imports the router from the router.js file in the routes directory and uses the imported router for all routes that begin with /api |
| Line 16 | Starts the server and displays a message in the console that the server is running on the defined port |
We define our routes in router.js and then wrap the logic in it. The reason why we use an extra file here is for clarity. If your application has 20 or more routes at some point, there will be a lot of chaos in index.js. That’s why we outsource our routes.
// routes/router.js

const express = require('express');
const router = express.Router();

const bcrypt = require('bcryptjs');
const uuid = require('uuid');
const jwt = require('jsonwebtoken');

const db = require('../lib/db.js');
const userMiddleware = require('../middleware/users.js');

router.post('/sign-up', (req, res, next) => {});

router.post('/login', (req, res, next) => {});

router.get('/secret-route', (req, res, next) => {
  res.send('This is the secret content. Only logged in users can see that!');
});

module.exports = router;
Here we register the route /api/sign-up to register and /api/login to log in. We also have the route /api/secret-route, which you should only be able to access if you are logged in. Currently, any user can access it. But more on this later.
In line 10 we also include our file for the database connection.
We also include the file ../middleware/users.js, which contains the code to verify the requests. This means that we check there whether the user has entered a password, for example, and whether the user name corresponds to the guidelines. We later switch these queries as middleware in the call of our routes.
4. Create middleware for validation
We package the logic for our Node.js login system in middleware. This is essentially a small programme that is inserted between two components. In this case, we have middleware between our request and the actual registration that validates the data entered. Validation for registration can look like this:
// middleware/users.js

const jwt = require("jsonwebtoken");

module.exports = {
  validateRegister: (req, res, next) => {
    // username min length 3
    if (!req.body.username || req.body.username.length < 3) {
      return res.status(400).send({
        message: 'Please enter a username with min. 3 chars',
      });
    }
    // password min 6 chars
    if (!req.body.password || req.body.password.length < 6) {
      return res.status(400).send({
        message: 'Please enter a password with min. 6 chars',
      });
    }
    // password (repeat) must match
    if (
      !req.body.password_repeat ||
      req.body.password != req.body.password_repeat
    ) {
      return res.status(400).send({
        message: 'Both passwords must match',
      });
    }
    next();
  }
};
When our /sign-up route is called, our middleware should be executed. To do this, we change the highlighted line as follows:
// routes/router.js

const express = require('express');
const router = express.Router();

const userMiddleware = require('../middleware/users.js');

router.post('sign-up', userMiddleware.validateRegister, (req, res, next) => {});

router.post('login', (req, res, next) => {});

module.exports = router;
5. Create logic for Rest API
5.1 Register Route
To add a new user to the database, we must check whether the user name does not yet exist. If the user exists, an error message is displayed. If the user does not yet exist, the password entered is hashed using our bcryptjs module and then all data is entered into the database.
// routes/router.js

router.post('/sign-up', userMiddleware.validateRegister, (req, res, next) => {
  db.query(
    'SELECT id FROM users WHERE LOWER(username) = LOWER(?)',
    [req.body.username],
    (err, result) => {
      if (result && result.length) {
        // error
        return res.status(409).send({
          message: 'This username is already in use!',
        });
      } else {
        // username not in use
        bcrypt.hash(req.body.password, 10, (err, hash) => {
          if (err) {
            return res.status(500).send({
              message: err,
            });
          } else {
            db.query(
              'INSERT INTO users (id, username, password, registered) VALUES (?, ?, ?, now());',
              [uuid.v4(), req.body.username, hash],
              (err, result) => {
                if (err) {
                  return res.status(400).send({
                    message: err,
                  });
                }
                return res.status(201).send({
                  message: 'Registered!',
                });
              }
            );
          }
        });
      }
    }
  );
});
If the user is successfully entered, the status code 201 (‘created’) is returned and the function call is ended.
Have you ever heard of double opt-in? Confirmation emails are sent to verify a registration. In this tutorial you will learn how to implement double opt-in in your Node.js application (based on this tutorial).
5.2 Login Route
In addition to the registration process, we have a login route in our login system to log in for users who are already registered. Here, the matching database entry is searched for using the user name. Then the entered password is checked against the encrypted password from the database using jwt.compare(). A short SQL query sets the last login date/time to the current value in line 45.
// routes/router.js

[...]
router.post('/login', (req, res, next) => {
  db.query(
    `SELECT * FROM users WHERE username = ?;`,
    [req.body.username],
    (err, result) => {
      if (err) {
        return res.status(400).send({
          message: err,
        });
      }
      if (!result.length) {
        return res.status(400).send({
          message: 'Username or password incorrect!',
        });
      }

      bcrypt.compare(
        req.body.password,
        result[0]['password'],
        (bErr, bResult) => {
          if (bErr) {
            return res.status(400).send({
              message: 'Username or password incorrect!',
            });
          }
          if (bResult) {
            // password match
            const token = jwt.sign(
              {
                username: result[0].username,
                userId: result[0].id,
              },
              'SECRETKEY',
              { expiresIn: '7d' }
            );
            db.query(`UPDATE users SET last_login = now() WHERE id = ?;`, [
              result[0].id,
            ]);
            return res.status(200).send({
              message: 'Logged in!',
              token,
              user: result[0],
            });
          }
          return res.status(400).send({
            message: 'Username or password incorrect!',
          });
        }
      );
    }
  );
});
In lines 33 and 34, we pass variables that we want to ‘save’ in the JWT token. This gives us access to these variables in the protected routes.
In line 36 you must pass a key with which the JWT token is generated, this is important later for the check. You can enter any string here.
You can also specify how long the token should be valid in line 37. Values such as ‘1h’ or ‘3m’ are valid here. The individual values and parameters can also be found in the documentation.
If the password is incorrect or the user name does not exist, an error message is displayed. This message is intentionally identical, as otherwise a potential attacker can obtain information about the existence of individual user profiles.
If the login is successful, the user object and the token generated by JWT are returned. This token is important for all routes in which you should be logged in. In part 2 of this Node.js login tutorial, you will learn how to pass it with every request. If you are testing the Rest API with Postman, you can specify the token with the ‘Authorisation’ key as a value using the following syntax: ‘Bearer KEY’.

Errors can occur during the development of a Rest API – this is completely normal. Often, some edge cases are not considered. I have summarised here how you can select these test cases and test them automatically: Test Rest API correctly.
5.3 Routes with Login
The most important routes are now ready. We can add new users and log in with existing accounts. Now we want to protect routes. This means that only logged-in users have access to them.
To do this, we create a new middleware in our users.js. The token is taken from the header of the request and verified by JWT.
// middleware/users.js

  [...]
  isLoggedIn: (req, res, next) => {
    if (!req.headers.authorization) {
      return res.status(400).send({
        message: 'Your session is not valid!',
      });
    }
    try {
      const authHeader = req.headers.authorization;
      const token = authHeader.split(' ')[1];
      const decoded = jwt.verify(token, 'SECRETKEY');
      req.userData = decoded;
      next();
    } catch (err) {
      return res.status(400).send({
        message: 'Your session is not valid!',
      });
    }
  }
  [...]
In the highlighted line, you must enter the same key that you have already used to generate the JWT.
To protect a route, simply integrate this middleware when calling up the route as follows:
// routes/router.js

[...]
router.get('/secret-route', userMiddleware.isLoggedIn, (req, res, next) => {
  console.log(req.userData);
  res.send('This is the secret content. Only logged in users can see that!');
});
[...]
req.userData contains the data that we have stored in the JWT key (in this case username and userId). This allows us to read user-defined values from the database using the userId for protected routes, for example.
View complete code in Git repository
6. Deploy Node.js login system
Great, your Node.js login system with Express, JWT and MySQL is ready. Now you can build a fancy frontend and connect your backend.
I have described how you can then deploy your finished app – i.e. make it live – here.
➡️ Click here for part 2: Vue.js login system with Vuex & Axios
Ahoj, veľmi sa mi páčil tvoj návod na prihlasovaciu registráciu s vue a js. Ale mám jednu otázku ohľadom štruktúry priečinkov. Všetky súbory, ktoré vytvorím v tejto časti, by sa mali nahrať niekde vo finálnom projekte VUE alebo by som ich mal nejako roztriediť a umiestniť do rôznych priečinkov. Pretože keď som začal robiť váš tutoriál riadok po riadku v časti 4, dostal som 28 chýb 😅. Som v tom nový, ďakujem za odpoveď.
//In english sorryHi, I really liked your tutorial on login register with vue and js.But I have one question about the folder structure. All of the files that I will make in this part one should be uploaded somewhere in the final VUE project or should I somehow sort it and put it in different folders. Because when I started doing your tutorial line by line on section 4, I got 28 errors 😅. I’m new to this, thanks for the reply.Ahoj, veľmi sa mi zapáčil váš návod na login register
You can put it in different folders:
This is the structue I use for my projects. You need to run npm run build to create the production files for Vue. You also have to add the following lines in your main Node.js file to handle the frontend files:
// handle productionif (process.env.NODE_ENV === "production") {
// static folder
app.use(express.static(__dirname + "/public"));
// handle SPA
app.get(/.*/, (req, res) => res.sendFile(__dirname + "/public/index.html"));
}
Hi,I have used your Signup Api and it is successfully registered. but when will I get json token.please help me out.
You will get a JSON token when you use the /login route. Check out step 7 on this tutorial
Hi,Very nice article, thanks! It’s the best I found on internet for implementing JWT authentification with mySql database.I’m newer on NodeJS and I really want to use MySQL for my database as the mainstream mongoDB seems to be overcomplicated to configure locally…So after implementing this authentification, I found 2 things on internet that I want to share here:I see that the body-parser package is not an obligation if you use NodeJS version 4 and above (and also some older versions), you can simply use a middleware that is embedded on express like this: app.use(express.json())The use of the mysql package is deprecated, since you’re only able to use a 24 years old authentication method to access your mysql database (mysql_native_password), but with the use of the newer well maintained mysql2 package, you can use the newer and more secured authentication method in mySql 8 (caching_sha2_password). Hope this can help!
Thanks! 🙂
And thank you for your hints. I myself use the express.json() method and I need to update this post. I never heard of the mysql2 package before. But I will check it out and update this post as soon as possible.
Hi sir, can you help me?
i have a problem that: my code is running good without any bugs, but when im trying to test with postman, im doing tutorial like you said: “Tab “body”, format “raw”, select “JSON” and parse the data like this:
{
“username”: “test”,
“password”: “test”,
}”
but it show a error: “SyntaxError: Unexpected token } in JSON at position 51” when im trying “POST method” at “http://localhost:3000/api/sign-in”
Do you know how to fix that, im new to nodejs, so i dont have enough knowledges to fixed all this bugs, even im trying to google it 🙁
Hey! Did you really enter the ” after the last closing bracket? That is wrong. You can test the JSON string with this tool: https://jsonformatter.curiousconcept.com/
middleware/users.js needs
const jwt = require(‘jsonwebtoken’);
This didn’t work for me: token = req.headers.authorization.split(‘ ‘)[1];
With express 4, I replaced that with : token = req.get(‘Authorization’);
while the header is in the form in this curl example:
curl -H “Content-Type: application/json” -H “Authorization: eyJhbGciOiJIUzI1NiIsInR5cCI6IkpXVCJ9.eyJ1…….” http://localhost:3000/api/secret-route
Thanks a lot for this great post!
However, i met a problem with the secret-route. I post login with success, copy the token, and add it to authorisation after ‘Bearer’ and i always get “msg”: “Your session is not valid!”. Has someone get the same error?
I’m glad!
Try to debug your incoming header data.
const token = req.headers.authorization.split(' ')[1];Output this on your console. Maybe you set it wrong in Postman, if you use this program.
It logs me the token, I get the same error. I had try with Angular and i get the same too
In the middleware, jwt wasn’t defined … :p. Thanks again for this tuto!
I wish I could deploy on xampp, how to do it?
I don’t know if that works with xampp. But if you want to deploy it localy, you can just download Node.js for Windows/Mac manually here: https://nodejs.org/en/
LH
solved by config url/encoded to body parser
app.use(bodyParser.urlencoded({ extended: false }))
Oh, perfect! 😉
i put that bodyparser url/encoded on my script but still get same error like you
where you input this script?
I have the same error i have put it in index.js
app.use(express.urlencoded({extended:false}));
and i get the error
{
“msg”: “Your session is not valid!”
}
i get some error,
{
“msg”: “Please enter a username with min. 3 chars”
}
im trying add body username at postman but still error
can you share the github source code?
The whole code is listed on this page.. Check if you added the data correctly to postman:
Tab “body”, format “raw”, select “JSON” and parse the data like this:
{"username": "test",
"password": "test",
}
LH