How to integrate Matomo into your Vue.js application


")


Matomo allows us to perform analysis and tracking under privacy protection. Matomo is also easy to integrate into Vue.js. I will show you how it works!
We may collect data about visitors to our Vue.js site, i.e. track and analyse their behaviour. At Matomo we pay special attention to the privacy and data protection of visitors, but we still have many ways to analyze the relevant data.
Tracking without cookies is also possible with Matomo. This is one of the reasons why I use Matomo in Vue.js applications and also on this site. Furthermore Matomo On-Premise is free of charge.
Corresponding opt-in and opt-out procedures are of course also provided.
1. Install Matomo
1.1 Download Matomo
First you have to download Matomo here and unzip the target directory or directly into your webspace.
If you are using tracking software, such as Matomo, you should also make sure to include the necessary information in your privacy policy. This is no legal protection, please contact your data protection officer.
2.1 Select Matomo URL
You can host Matomo either in an extra directory, a subdomain or on a completely different domain. Also note that you can create multiple pages in one Matomo installation.
So if you plan to use Matomo on several sites, it might make sense to install Matomo on a neutral domain and enter all sites there in a bundled way.
This offers you the advantage that you can compare several pages with each other. Here are a few ideas in case you need inspiration:
- https://example.com/analytics
- https://analytics.example.com/
- https://analytics.example.com/
- https://analytics.other-domain.com/
I host my test application for this tutorial locally and have chosen the following directory: http://localhost:81/vue-matomo-test/matomo.
Additionally you can protect the Matomo site with a .htaccess and .htpasswd to provide even more security.
2.3 Create MySQL database
In the next step you have to create a MySQL database at your hoster or locally. If you want to create a local database, I can recommend the program XAMPP.
You need a database and a MySQL user with a secure password that has all rights for the database.
2.4 Run through the installation wizard
Once you have chosen your URL, put the downloaded files inside and created a database, you can simply visit the page. This is what you will see there:
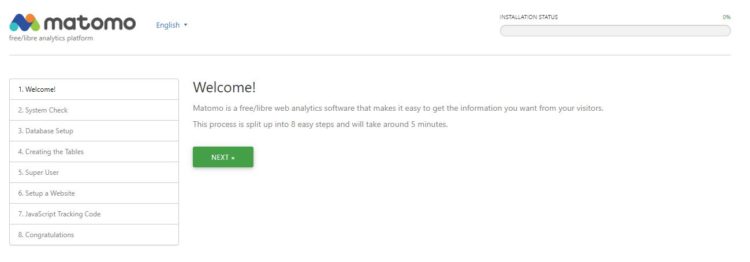
Here you can now go through the eight steps and enter the required data. All steps are self-explanatory and should not be a problem.
When you reach the end, this view appears. If you run your Vue.js site in the EU, you should check the box “Anonymize the last byte(s) of visitors IP addresses to comply with your local privacy laws/guidelines.
Nevertheless again the hint that you should consult your data protection officer for legal questions, I cannot and do not give any information or recommendations!
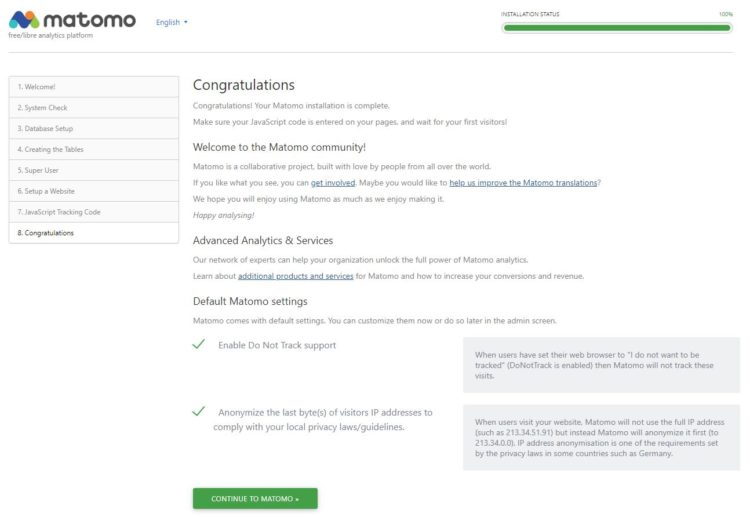
The installation is now complete. You can now open Matomo for the first time.
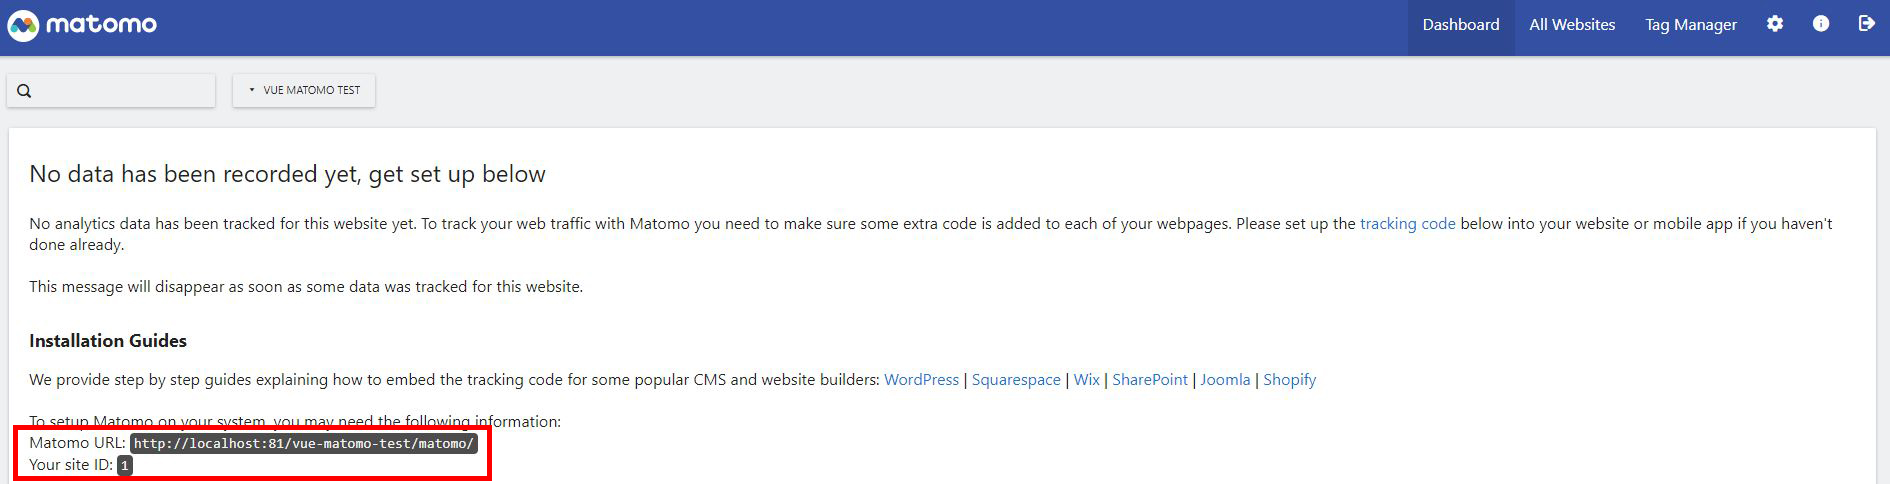
We need the information marked in red again in step 4.1 – so please write it down.
Besides Matomo you can also integrate Google Analytics into Vue.js to collect even more data.
2. Create Vue project
Now we come to the Vue.js part, of course we have to create a Vue.js application first, if not already done. We can do that easily with the Vue CLI.
If you are just starting out and want to learn Vue.js, I have examples of how to learn Vue.js here.
vue create vue-matomo-test
Your Vue.js app or page should always include the vue-router. Matomo can use it to track the data later.

It is recommended to create your own preset to create Vue Apps faster. In my example I have created a “lh-standard”. You can see the included modules on the picture.
3. Install Matomo Package
To integrate Matomo into our Vue.js application we use the package vue-matomo. You install it with the following command:
npm install vue-matomo
4. Matomo Integration
4.1 Integrate Vue Matomo
In our main.js we now have to insert the marked lines.
// src/main.js

import Vue from "vue";
import App from "./App.vue";
import router from "./router";
import store from "./store";
import VueMatomo from 'vue-matomo';


Vue.config.productionTip = false;

Vue.use(VueMatomo, {
  host: "https://your-local-matomo-url.com/",
  siteId: 1,
  trackerFileName: 'matomo',
  router: router,
  enableLinkTracking: true,
  requireConsent: false,
  trackInitialView: true,
  disableCookies: false,
  enableHeartBeatTimer: false,
  heartBeatTimerInterval: 15,
  debug: false,
  userId: undefined,
  cookieDomain: undefined,
  domains: undefined,
  preInitActions: []
});

new Vue({
  router,
  store,
  render: h => h(App)
}).$mount("#app");
In the lines 13 and 14 the data from your Matomo installation from step 2.4 come in.
4.2 Configure parameters
I have given you here again a list of the individual parameters with functions. The set values are default values. So you can decide yourself what you want and what is superfluous.
| Parameter | Description |
|---|---|
| host | The exact domain to your Matomo installation (see step 2.1). |
| siteId | In a Matomo installation you can create several pages. This ID is generated when creating in Matomo (see step 2.1). |
| trackerFileName | Matomo was formerly known as “piwik”. This parameter specifies the name of the PHP and JS tracking file. Since the piwik file simply points to the Matomo file, it can simply contain matomo as a value. |
| router | The name of your Vue Router variable. This is needed so that the individual page views can be tracked automatically, e.g. http://example.com and http://example.com/about. |
| enableLinkTracking | Enables link tracking for external links. |
| requireConsent | If true, a user must manually agree to the tracking. This is called opt-in and is discussed in more detail in step 5.2. |
| trackInitialView | Sets whether the first page view should be tracked. |
| disableCookies | Disables or enables the use of cookies in Matomo. Is recommended, especially for Vue.js pages that are subject to the DSGVO. More information directly at matomo.org. |
| enableHeartBeatTimer | If a visitor only visits one page, the duration of the session is not tracked. If this parameter is set to true, this data is collected. |
| heartBeatTimerInterval | Interval at which the session duration should be checked. |
| debug | Activates the debug mode. |
| userId | Here you can enter a Matomo user ID to recognize logged in persons in different browsers and devices. |
| cookieDomain | Shares the tracking cookie (if enabled) with other domains to enable recognition. |
| domains | Specifies which links should be marked as internal. |
| preInitActions | Here further actions can be performed when initializing the page. |
More descriptions and examples of the parameters can be found directly on the official NPMJS page.
4.3 Testing
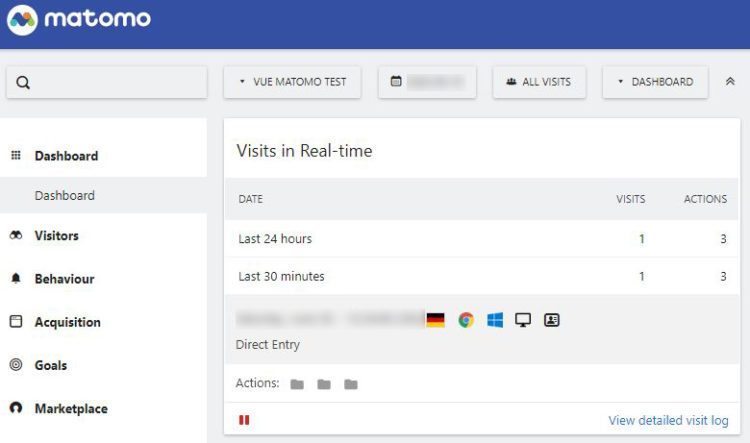
Now you can start your Vue.js application and watch in Matomo which data is tracked.
5. Further options and settings
5.1 Ignore routes
If you do not want to track certain page views, you can set this directly in the respective Vue Route.
// src/router/index.js

import Vue from "vue";
import VueRouter from "vue-router";
import Home from "../views/Home.vue";

Vue.use(VueRouter);

const routes = [
  {
    path: "/",
    name: "Home",
    component: Home
  },
  {
    path: "/about",
    name: "About",
    meta: {
      analyticsIgnore: true
    },
    // route level code-splitting
    // this generates a separate chunk (about.[hash].js) for this route
    // which is lazy-loaded when the route is visited.
    component: () =>
      import(/* webpackChunkName: "about" */ "../views/About.vue")
  }
];

const router = new VueRouter({
  mode: "history",
  base: process.env.BASE_URL,
  routes
});

export default router;
I have added the three marked lines to the default router. This means that every call to the /about page is no longer tracked.
5.2 Tracking Opt-In
Matomo offers the possibility to activate an opt-in for tracking. This means that a user must first actively agree that his visit may be tracked.
For this purpose we set the parameter requireConsent in our main.js to true. This way the visitor is no longer tracked.
You can now create a hint, like when you visit this page, where the user has to agree before his visit via a button. This can be implemented as an example:
<template>
  <div class="home">
    <button @click="allowCookies">Accept Cookies</button>
    <img alt="Vue logo" src="../assets/logo.png" />
    <HelloWorld msg="Welcome to Your Vue.js App" />
  </div>
</template>

<script>
// @ is an alias to /src
import HelloWorld from "@/components/HelloWorld.vue";

export default {
  name: "Home",
  components: {
    HelloWorld
  },
  methods: {
  	allowCookies() {
  		this.$matomo.rememberConsentGiven();
  	}
  }
};
</script>
This function must be executed once by the user. So calls to the subpages are tracked after the approval. Important is the call of the method this.$matomo.rememberConsentGiven();. You can find more information about this directly at matomo.org.
So you have all the information you need for successful tracking with Vue.js and Matomo! If you have any questions, you will find the comment field below. 🙂
-
Pingback: 8 Free SEO Tools you really need for your Website in 2021
-
Pingback: How to integrate Google Analytics into your Vue.js App