GitHub Actions: Tutorial for beginners – basics & examples


")


In this tutorial, I want to introduce you to GitHub Actions and show you how you can use GitHub Actions to create CI/CD pipelines to automate boring, repetitive tasks.
GitHub Actions is a versatile tool that developers can use to organise their software development processes more efficiently. You can mainly use GitHub Actions as a CI/CD pipeline (CI = Continuous Integration, CD = Continuous Delivery) and is therefore comparable with Jenkins, CircleCI or Azure DevOps, for example.
I myself actually use GitHub Actions in every repo that I have created in GitHub. For example, to deploy changes in this blog or as a complete CI/CD pipeline for my JavaScript Challenge platform.
What is GitHub Actions?
GitHub Actions is a powerful automation tool that is directly integrated into GitHub and enables developers to create automated workflows for their software development projects. GitHub Actions can be used to set up CI/CD pipelines, run tests, analyse code and much more. It offers a flexible and customisable way to automate development processes by combining different actions and workflows.
To be more precise, you can actually do anything you can think of: Execute unit tests, deploy to a VM, deploy to a Kubernetes cluster, create/build apps, deploy to various services of all common cloud providers, code security scans, etc. This list can be extended almost endlessly 😉
What do the terms CI/CD (pipeline, tools) and DevOps actually mean?
A workflow in GitHub Actions consists of one or more actions that are executed as steps in a defined sequence. These workflows are defined in YAML files and saved in the .github/workflows directory of the repository.
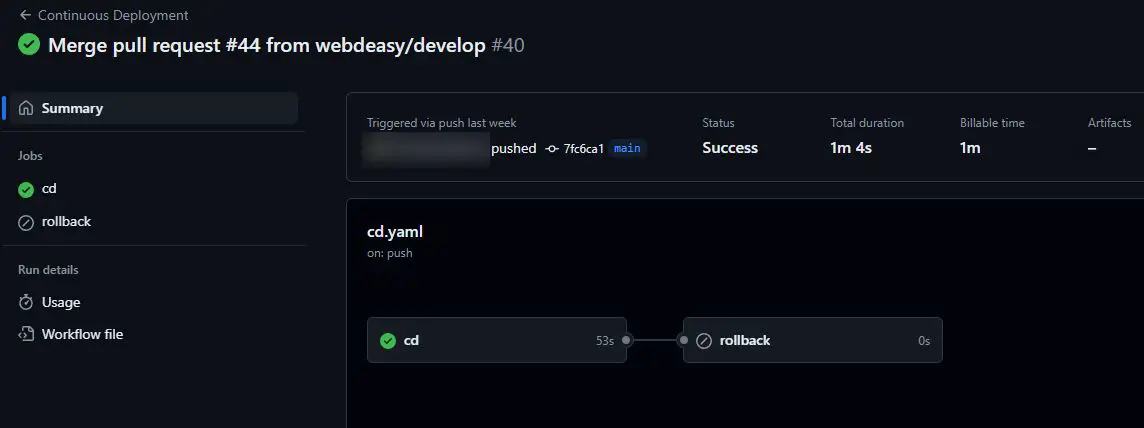
The screenshot is the result of executing the GitHub Actions Workflow of this blog, whereby changes in the repository are automatically rolled out on the production server. If an error occurs, a rollback to the last stable version is performed.
And what does the fun cost me? Nothing! GitHub provides the service for public repos completely free of charge and there is also a generous free quota for private repositories, which lasts for quite a while and resets every month.
Creating a GitHub Actions Workflow
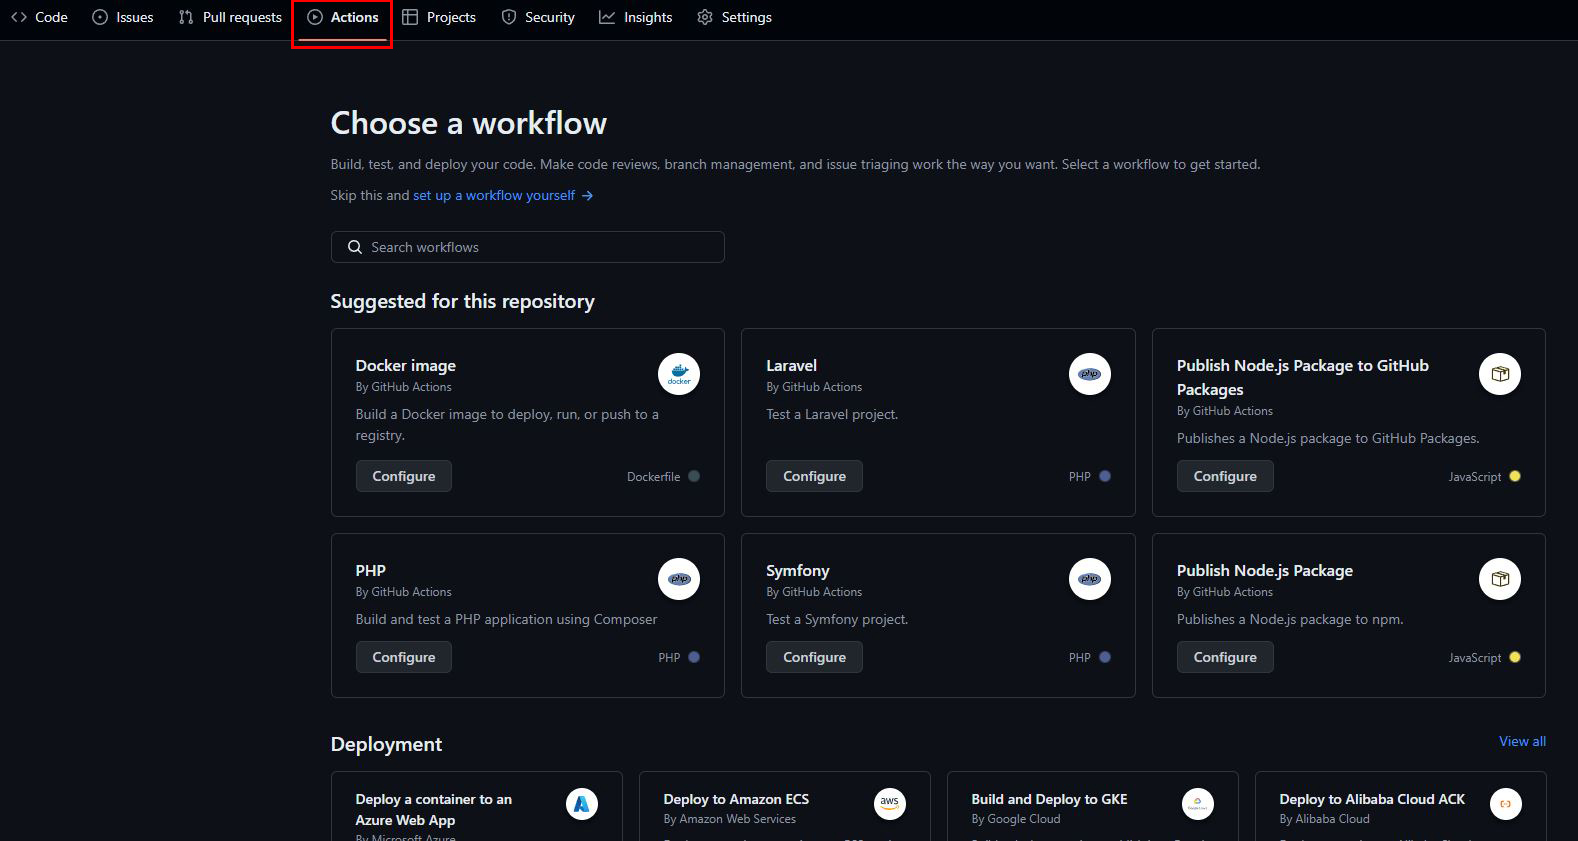
To create a new GitHub actions workflow, you can simply use the ‘Actions’ tab in your GitHub repo or alternatively create a YAML file in the path .github/workflows.
To understand how a workflow in GitHub Actions is structured, I have a very simple CI pipeline for you here, which I will explain step by step.
name: CI Pipeline

on: [push]

jobs:
  build:

    runs-on: ubuntu-latest

    steps:
    - name: Check out repository
      uses: actions/checkout@v2

    - name: Set up Node.js
      uses: actions/setup-node@v2
      with:
        node-version: '20'

    - name: Install dependencies
      run: npm install

    - name: Run tests
      run: npm test
What exactly happens here? The pipeline is triggered every time a push is executed in the repository. You can find out more about triggers and events later in this GitHub Actions tutorial. Let’s go through the steps one by one:
- Check out repository: This step checks out the code in the repository.
- Set up Node.js: Deploys Node.js version 20 in the current environment.
- Install dependencies: Executes the
npm installcommand to install the project dependencies. - Run tests: Executes the
npm testcommand to run the tests of the project.
This example shows you the basic structure of a pipeline. You can execute any number of steps and jobs per GitHub Actions workflow.
Triggers & Events
GitHub Actions provides a flexible way to execute workflows based on various triggers and events. These triggers determine when a workflow is started and can respond to a variety of GitHub events, such as code changes, issues and schedules.
Code changes/new commits on a specific branch:
This workflow is only executed when a commit is pushed to the develop branch.
on:
  push:
    branches:
      - develop
Tags that correspond to a specific pattern:
Here, the workflow is only started if a tag beginning with release- (e.g. release-1.0.0) is pushed.
on:
  push:
    tags:
      - 'release-*'
Regular execution:
This workflow is executed every Monday at 12 noon.
on:
  schedule:
    - cron: '0 12 * * 1'
It is also very useful to carry out tests and linting, for example, before a pull request can be confirmed.
GitHub Marketplace
You don’t have to programme all actions yourself. That’s why the GitHub Marketplace is a central point of contact for predefined actions that you can integrate into your workflows to speed up and simplify the development process. Here you will find a variety of actions created by the community and GitHub itself to automate common tasks such as testing, code analysis and much more.
Suppose you want to use an action that automatically checks your code for formatting errors. A popular action for this purpose is the Prettier action, which formats the code with Prettier.
Here is an example of how you can integrate this action into your workflow:
name: Format Code

on: [push, pull_request]

jobs:
  format:

    runs-on: ubuntu-latest

    steps:
    - name: Check out repository
      uses: actions/checkout@v2

    - name: Run Prettier
      uses: creyD/prettier_action@v3.3
      with:
        prettier_options: --write **/*.js
This workflow is executed for every push and pull request and checks whether the JavaScript code is formatted correctly. The prettier_action is integrated from the GitHub Marketplace and configured with the desired options.
Using the GitHub Marketplace offers considerable advantages, such as time savings, as you have immediate access to numerous ready-made actions without having to develop your own solutions. In addition, the regular maintenance and updating of the actions ensures high quality and security. Thanks to the support of the GitHub community, you benefit from constantly improved and new actions.
Other useful actions
- CodeQL Analysis: Automate code analysis to detect security vulnerabilities.
- Snyk Vulnerability Scan: Automated scan of your code for security vulnerabilities.
- Docker Build and Publish: Create and publish Docker images directly from your workflow.
- Slack Notifications: Send notifications to Slack channels to inform your team about the status of workflows.
GitHub Actions Best Practices
If you use GitHub Actions, I think there are a few best practices that you should follow. This can save you execution time and increase the security of your workflows.
- Use secrets and variables: Use secrets and environment variables to securely manage sensitive data such as API keys or access data. Store this information in the repository without saving it directly in the code to minimise security risks (can be found in the repo settings under ‘Secrets and variables’).
- Optimise runtime: Optimise the runtime of your workflows by avoiding unnecessary steps and using caching techniques. This reduces the execution time and resource load, making your workflows more efficient.
- Monitor workflows: Monitor your workflows regularly to avoid unexpected errors. If a workflow fails, you will even be notified automatically by email. So keep an eye on your inbox too.
- Pay attention to the versioning of actions: Make sure to use specific versions of actions to ensure that changes or updates do not cause unexpected problems in your workflow. Use fixed version numbers instead of ‘latest’ to ensure consistency.
- Keep actions small: Keep your actions small and specific to increase maintainability and reusability. A modular structure makes debugging easier and allows you to update individual components quickly if necessary.
- Use the GitHub Marketplace: Access the GitHub Marketplace to find predefined actions and integrate them into your workflows. This saves time and effort, as you can access tested and reliable solutions instead of creating your own actions from scratch.
GitHub Actions Tutorial: Conclusion
As you can see, GitHub Actions is extremely flexible. Setting up a new workflow is sometimes a little time-consuming, but it saves time and nerves in the long run, as you save yourself repetitive tasks and thus avoid mistakes. To get started, I recommend the Quickstart Guide, directly from GitHub.
-
Pingback: Rest API Testing: How to test Rest APIs properly!
-
Pingback: CI/CD in Plesk: Deploy Node.js, React, Angular, Vue & Co. automatically