Set up Security Camera Livestream on Raspberry Pi (with USB webcam)


")


Security camera livestream with a Raspberry Pi? Of course! With a few tools it’s very easy and works great.
Security cameras are often very expensive and sometimes you don’t need so many functions. With the simplest materials and in a few steps I will show you how you can configure a security camera with live stream, i.e. live video, with your Raspberry Pi*. We can also make the livestream available outside our home network – otherwise it would all be pointless.
All you need is a Raspberry Pi*, a standard USB webcam (e.g. this one*), a little patience and these instructions 🙂
I have created this tutorial with the operating system Raspbian. But you can also use all other Linux distributions.
Feel free to check out these Linux commands for beginners first if you are completely new to the Linux world.
Prepare Raspberry Pi
The first step is to update your Raspberry Pi* to the latest software version. Execute the following command (the Pi should already be connected to the internet):
sudo apt-get update && sudo apt-get upgrade
Optional: Enable Remote Desktop
For the initial setup, you should of course have a monitor, keyboard and mouse connected to your Raspberry Pi. However, I find it annoying to constantly switch between my normal computer and the Pi. Therefore, you can make your life easier and access and configure your Raspberry Pi via remote desktop connection.
All you need to do is install the xrdp package:
sudo apt-get install xrdp
After that you can also connect your computer with the preinstalled program “Remote Desktop Connection” to your Raspberry Pi. The hostname of your Raspberry Pi is “raspberrypi” unless you have changed it.

As access data you use the ones you have set or the default access data:
Username: pi
Password: raspberry
Install Raspberry Pi Livestream Package (Motion)
Now run the following command to install the Motion Package, which we will use to stream the video:
sudo apt-get install motion -y
The configuration is done in the next step.
Set Raspberry Pi security camera correctly
Now connect your USB webcam to the Raspberry Pi if you haven’t already done so.
With this command you can check if your USB webcam is recognized by the system:
lsusb
Your camera should be listed here. For me it is the top entry.

Also, the ls /dev/video* command should produce the following output:

Now that the camera is running, we can set up Motion. Motion actually does all the work for us: It starts a daemon in the background which permanently provides us with the current video image and can display it on a web interface.
To configure Motion so that we end up with a smooth image let’s output some properties of our cam. For this you use the command v4l2-ctl -V.
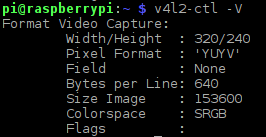
From this we need some data that will become important in the next steps. We now need to edit the motion configuration file. Use the following command:
sudo nano /etc/motion/motion.conf
Countless parameters can be changed here. I had to experiment a bit to get an almost smooth image in the end. I would recommend you to adjust all settings as follows. If the picture is not ok at the end you can play around with the parameters yourself. Adjust the red marked lines in your configuration file.
# Start in daemon (background) mode and release terminal (default: off)
daemon on
The values for the parameters v4l2_palette, width and height are taken from the output of our previous command.
# v4l2_palette allows to choose preferable palette to be use by motion
# to capture from those supported by your videodevice. (default: 17)
# E.g. if your videodevice supports both V4L2_PIX_FMT_SBGGR8 and
# V4L2_PIX_FMT_MJPEG then motion will by default use V4L2_PIX_FMT_MJPEG.
# Setting v4l2_palette to 2 forces motion to use V4L2_PIX_FMT_SBGGR8
# instead.
#
# Values :
# V4L2_PIX_FMT_SN9C10X : 0  'S910'
# V4L2_PIX_FMT_SBGGR16 : 1  'BYR2'
# V4L2_PIX_FMT_SBGGR8  : 2  'BA81'
# V4L2_PIX_FMT_SPCA561 : 3  'S561'
# V4L2_PIX_FMT_SGBRG8  : 4  'GBRG'
# V4L2_PIX_FMT_SGRBG8  : 5  'GRBG'
# V4L2_PIX_FMT_PAC207  : 6  'P207'
# V4L2_PIX_FMT_PJPG    : 7  'PJPG'
# V4L2_PIX_FMT_MJPEG   : 8  'MJPEG'
# V4L2_PIX_FMT_JPEG    : 9  'JPEG'
# V4L2_PIX_FMT_RGB24   : 10 'RGB3'
# V4L2_PIX_FMT_SPCA501 : 11 'S501'
# V4L2_PIX_FMT_SPCA505 : 12 'S505'
# V4L2_PIX_FMT_SPCA508 : 13 'S508'
# V4L2_PIX_FMT_UYVY    : 14 'UYVY'
# V4L2_PIX_FMT_YUYV    : 15 'YUYV'
# V4L2_PIX_FMT_YUV422P : 16 '422P'
# V4L2_PIX_FMT_YUV420  : 17 'YU12'
#
v4l2_palette 15
# Image width (pixels). Valid range: Camera dependent, default: 352
width 512

# Image height (pixels). Valid range: Camera dependent, default: 288
height 288
# Maximum number of frames to be captured per second.
# Valid range: 2-100. Default: 100 (almost no limit).
framerate 30
Tip: You can search for words in the nano editor with CTRL+W.
# Let motion regulate the brightness of a video device (default: off).
# The auto_brightness feature uses the brightness option as its target value.
# If brightness is zero auto_brightness will adjust to average brightness value 128.
# Only recommended for cameras without auto brightness
auto_brightness on
# Number of frames to capture after motion is no longer detected (default: 0)
post_capture 5
# The quality (in percent) to be used by the jpeg compression (default: 75)
quality 100
# Use ffmpeg to encode movies in realtime (default: off)
ffmpeg_output_movies on
# Bitrate to be used by the ffmpeg encoder (default: 400000)
# This option is ignored if ffmpeg_variable_bitrate is not 0 (disabled)
ffmpeg_bps 500000
# Use ffmpeg to deinterlace video. Necessary if you use an analog camera
# and see horizontal combing on moving objects in video or pictures.
# (default: off)
ffmpeg_deinterlace off
# Quality of the jpeg (in percent) images produced (default: 50)
stream_quality 35
# Output frames at 1 fps when no motion is detected and increase to the
# rate given by stream_maxrate when motion is detected (default: off)
stream_motion off
# Maximum framerate for stream streams (default: 1)
stream_maxrate 30
# Restrict stream connections to localhost only (default: on)
stream_localhost off
Now we have to activate the daemon, i.e. the motion service:
sudo nano /etc/default/motion
Here you simply set the parameter of start_motion_daemon to yes and save the file.
All ready! Let’s start our security camera! 🙂
sudo nano service motion start
You should now see the livestream via the web interface: http://localhost:8081.
You can adjust more parameters in the config. Note that you always have to restart the service afterwards with sudo nano service motion restart.
Make security camera available to the outside (on the Internet)
Of course, the security camera makes more sense if it is not only accessible in the home network, but also from outside, i.e. worldwide. You can configure a router accordingly.
I use a VPN connection to my home network and then connect to the web interface via the hostname: http://raspberrypi:8081. I have described the setup in a separate tutorial:
Set up VPN with DynDNS on your router
Fix Raspberry Pi boot problems
Initially I had the problem that my Pi did not start without a monitor. The small box should be hidden somewhere, of course. The solution is that you select any setting with sudo raspi-config under Advanced Options > A5 Resolution. Without an HDMI input, the Pi will not start properly otherwise.
Conclusion
As you can see, it doesn’t take much to build your own security camera with a Raspberry Pi. For what purpose will you use it?