Set up the FRITZ!Box VPN: How it works


")


VPNs are more popular than ever. But did you know that you can also set up a VPN on the FRITZ!Box.
In this step-by-step guide, I’ll show you how easy it is to set up a FRITZ!Box VPN so that you can access your home network from anywhere at any time. You can either use a free MyFRITZ! account or your own domain. You will also learn how to set up the VPN connection on all end devices.
What is a VPN?
You currently see adverts for countless VPN providers every day, telling you how important a VPN is. VPN stands for Virtual Private Network and that’s exactly what it is in principle. A virtual private network. You connect virtually to another network (without an actual physical connection) and can then access all the network resources available there.
You can imagine it as if you were to take your laptop and log into a friend’s WLAN. Only from your home. In this case, the friend is the VPN provider. Incidentally, this FRITZ!Box VPN can also be used to bypass the geo-blocking of streaming providers 😉
Of course, a VPN has many other functions and advantages – but that should be enough for a rough understanding.
Set up VPN on the FRITZ!Box
To connect to your FRITZ!Box with the VPN, we need a URL or domain that we can connect to. AVM provides the MyFRITZ! service free of charge for this purpose. This gives you a free domain that looks something like this: Jdf8s94n37Jdlanmcy4.myfritz.net.
If you have your own domain, I recommend that you use the DynDNS service for the FRITZ!
To activate this service, you can follow the steps below:
- Open the interface of your FRITZ!Box (http://fritz.box) and log in with your access data.
- Select ‘Extended view’ at the top right of the three dots.
- Navigate to the menu item Internet > MyFRITZ! Account.
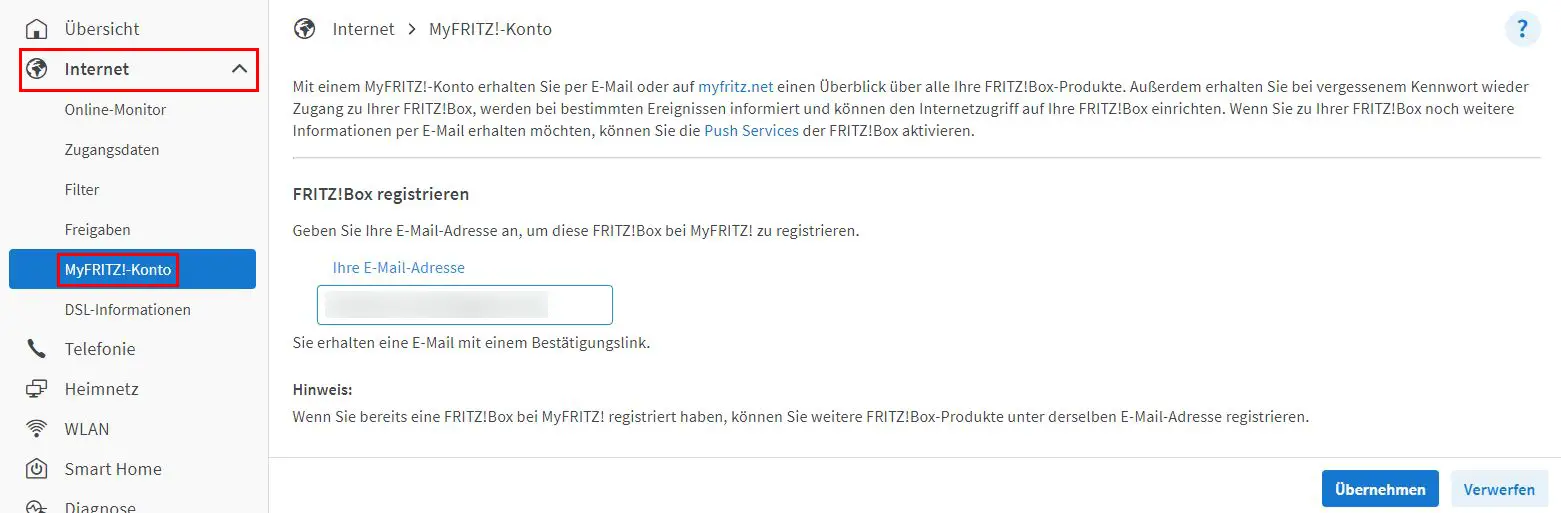
- Enter your e-mail address here. You will receive an e-mail asking you to confirm your e-mail address and set a password. Make sure you use a secure password here, as this access data can cause a lot of damage in the wrong hands.
- The ‘Set up MyFRITZ! Internet access’ option should then be available in the same view.
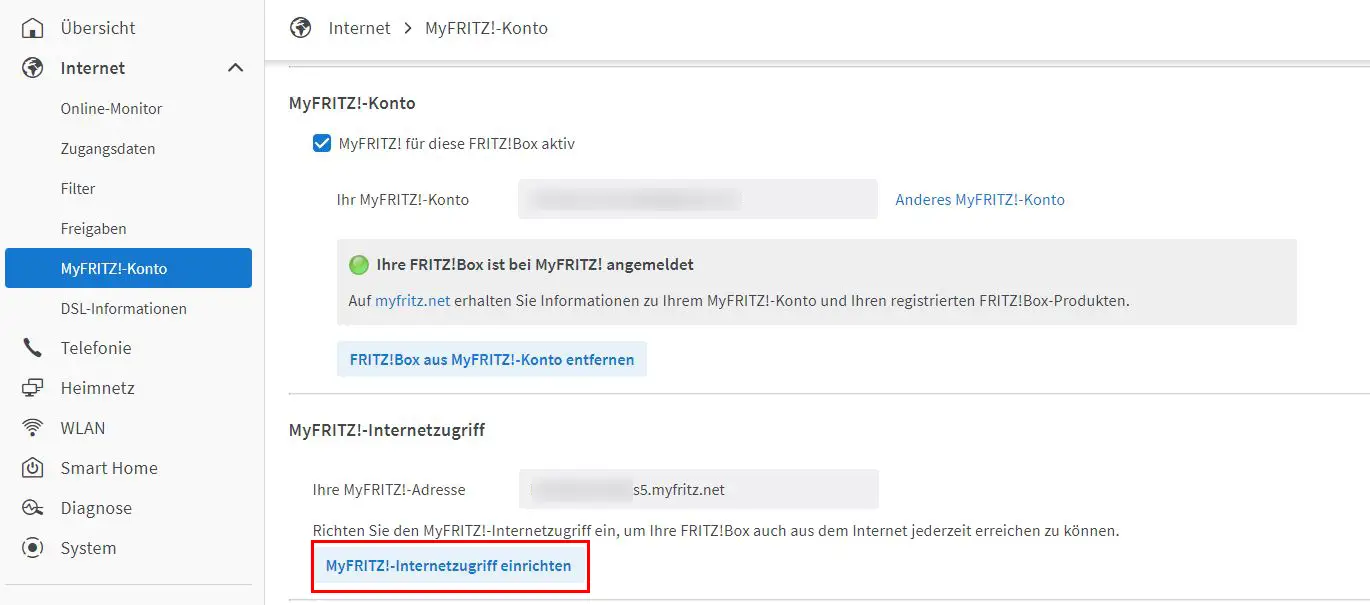
- Then click on ‘Set up FRITZ!Box user’. If you have already created a user and this option does not appear, navigate manually to the menu item System > FRITZ!
Important: The option ‘VPN’ and ‘Access from the Internet allowed’ must be activated for the user.
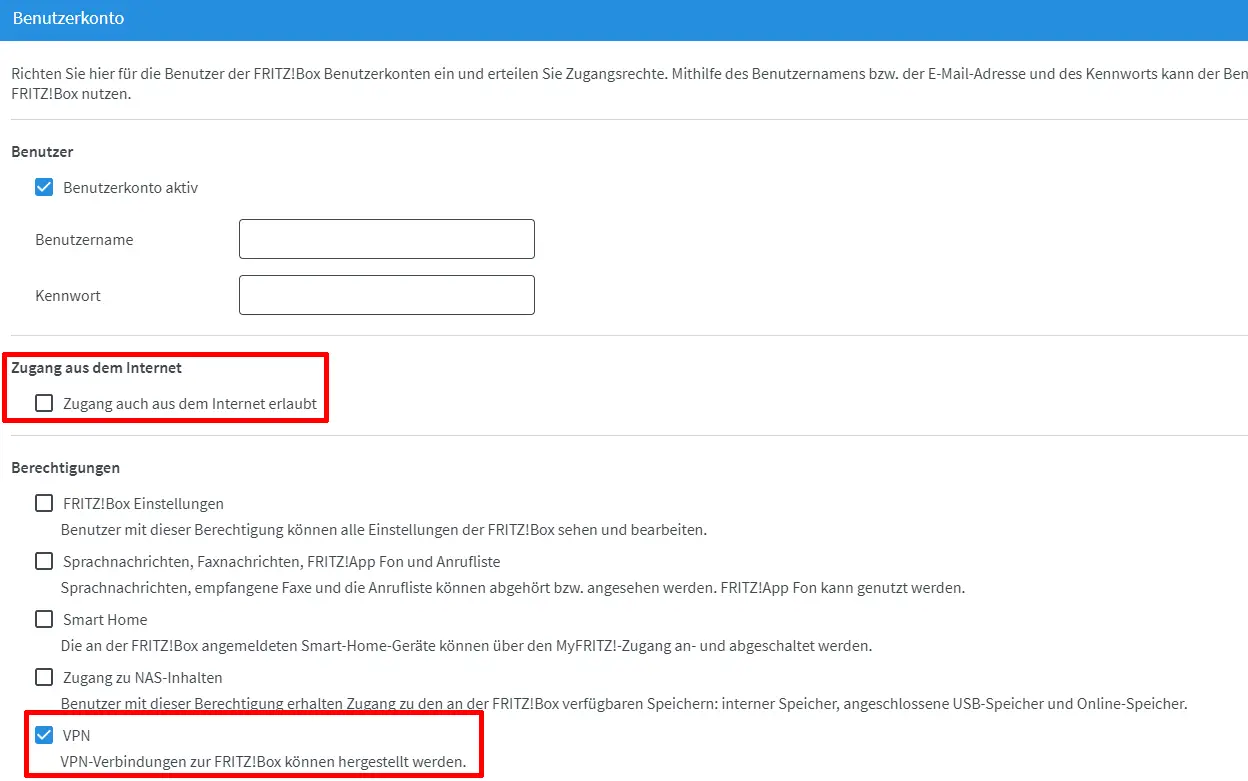
- Now create a new user. To save, you must enter a numerical code on a connected phone or press a button on your router.
Your FRITZ!Box is now accessible from the Internet via this URL!
Now we have a domain, or a MyFRITZ! address, which we can always use to reach our home router. This is the prerequisite so that we can now connect to our home network from anywhere via VPN.
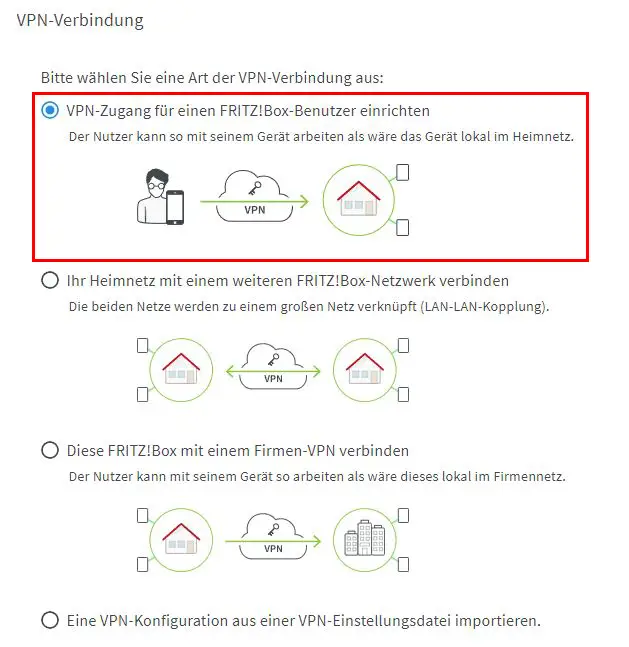
To do this, navigate to Internet > Permit Access > VPN (IPSec). If your user does not appear here, click on ‘Add VPN connection’. If the user you have created is listed here, everything is already set up and you can set up the VPN connection on your end device directly.
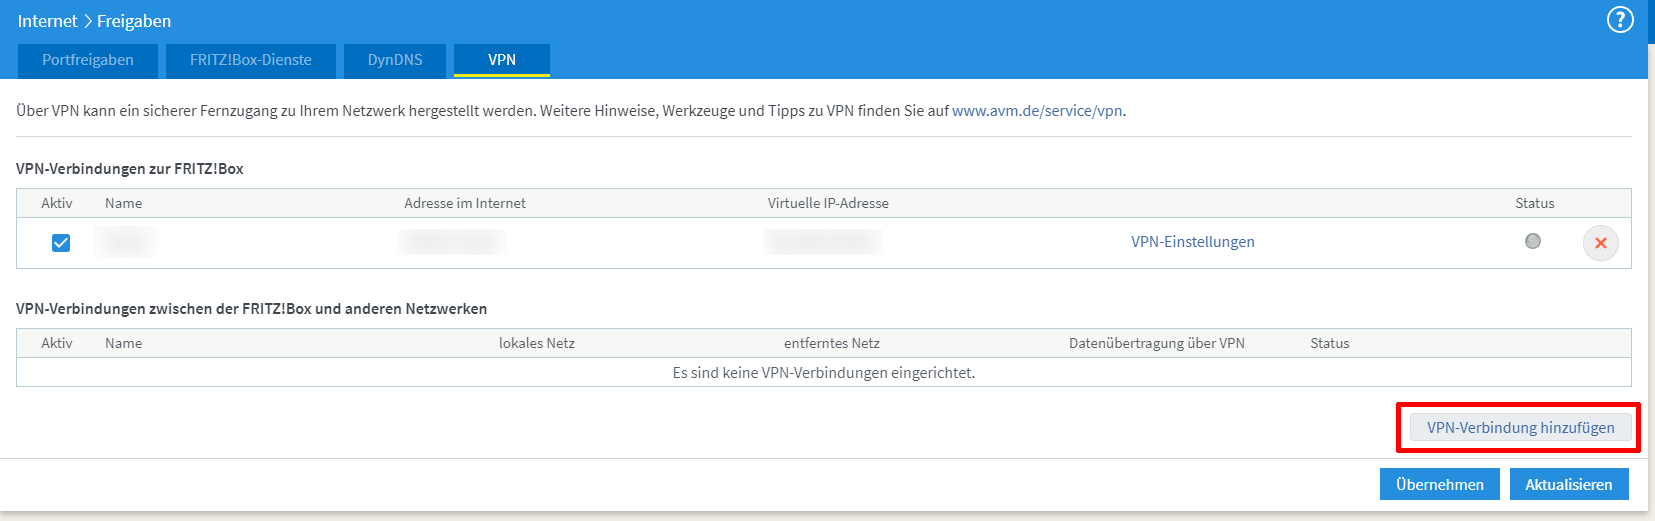
There you must select the type of VPN. Select the option ‘Configure VPN connection for a FRITZ!Box user’.
Disclaimer: If these credentials fall into the hands of the wrong people, they could potentially gain access to your entire home network!
That’s basically all there is to it. The VPN connection is now activated and is waiting for an incoming connection from you.
Set up FRITZ!Box VPN on your end device
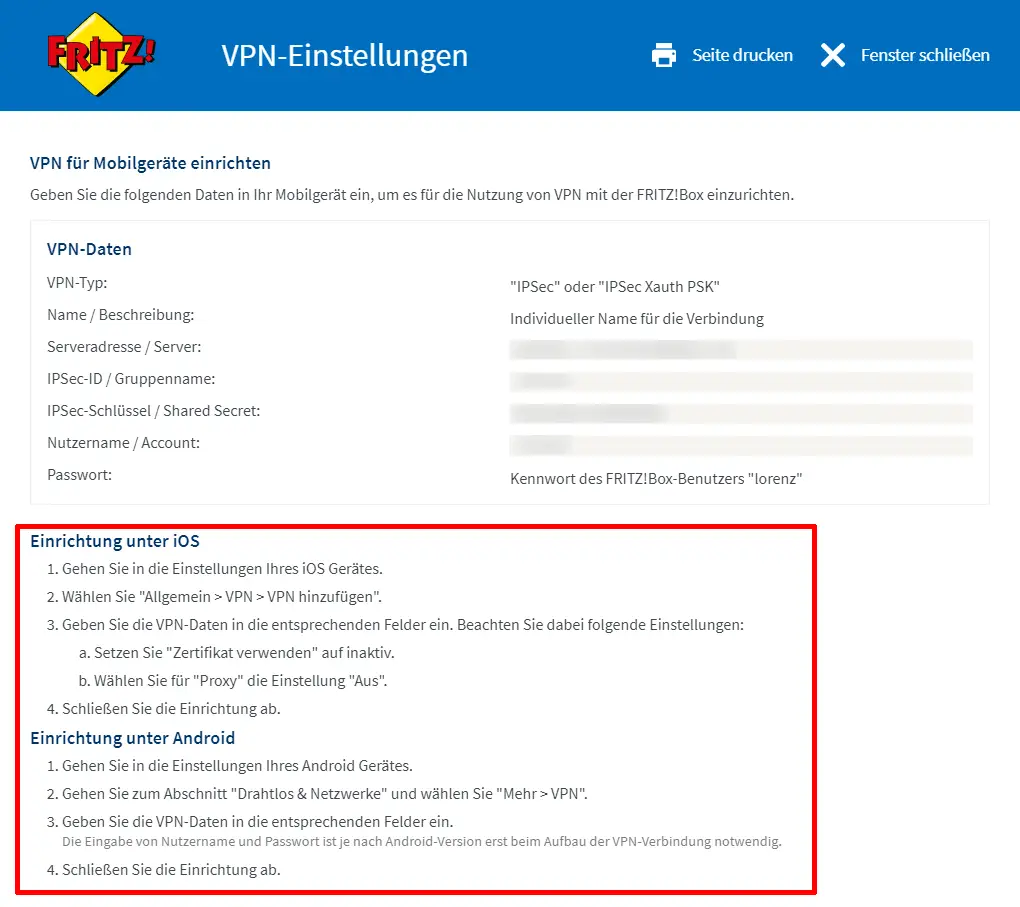
Retrieve VPN connection data
If you switch back to the overview under Internet > Permit Access > VPN, you will find the somewhat misnamed item ‘VPN settings’.
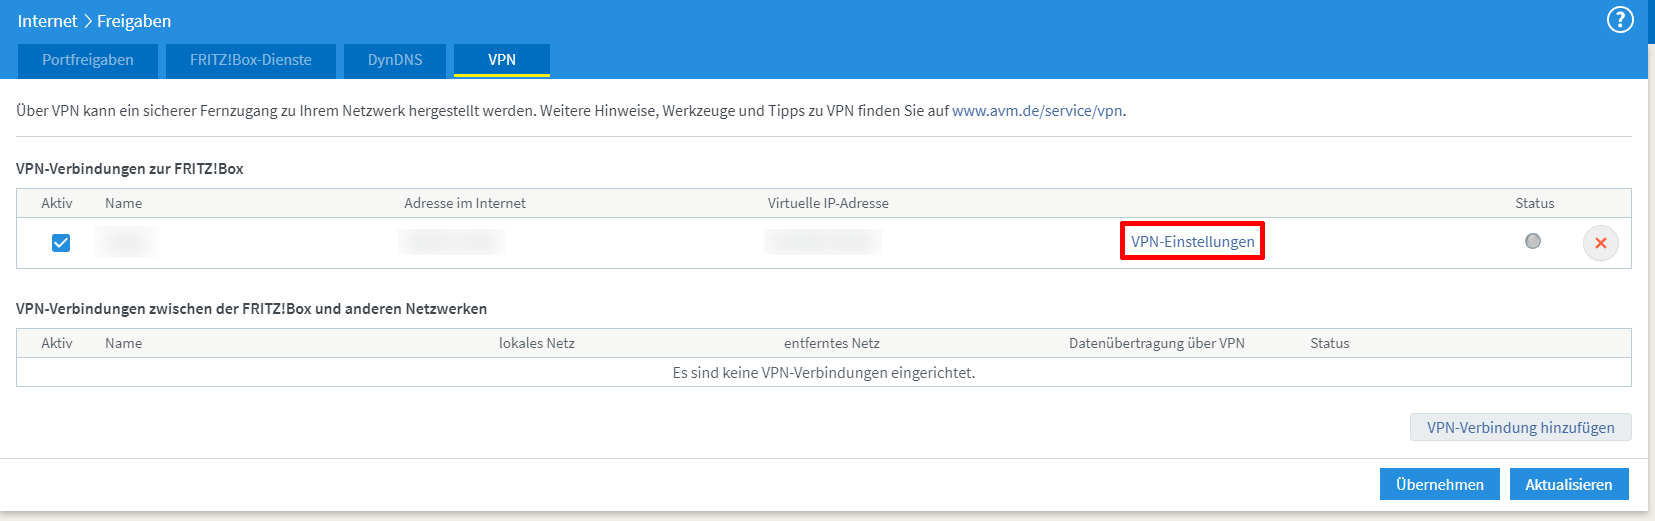
There you will find this overview to set up the VPN on your devices.
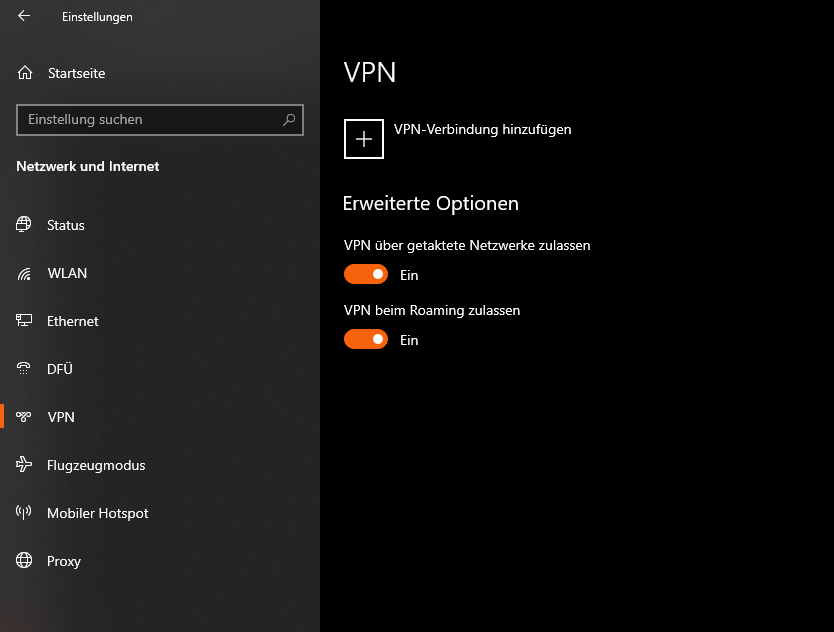
Set up VPN under Windows
Under your Windows settings, you will find the menu item ‘VPN’ under ‘Network and Internet’. You can add the VPN connection there.
As an alternative to the integrated option in Windows, you can also use the FRITZ!Box remote access programm.
Set up VPN under macOS
In macOS, navigate to Apple in the top menu and then to System Preferences > Network. Click on the ‘+’ in the list on the left and select ‘VPN’ under Connection. Then enter all other connection data. Select the option ‘IPSec’ as the type.
Set up VPN under iOS
On iOS, you can find the VPN option in the settings under General > VPN and device management. You can enter the connection data there.

Set up VPN under Android
Under Android you will find the item ‘Network & Internet’ in the settings and there ‘VPN’. Again, you simply have to enter the access data.
Possible problems & errors
Are you having problems or errors setting up the FRITZ!Box VPN connection? I have compiled the most frequently asked questions for you here.
Yes, this tutorial describes the complete setup of the FRITZ!Box VPN. You can either use the free MyFRITZ! account or use a DynDNS service for the FRITZ!
Nothing. Using a VPN in the FRITZ!Box is free of charge. All required services and programmes are available free of charge.
No. FRITZ!Box does not currently support the open OpenVPN standard.
Current models support two VPN solutions: Established IPSec and Wireguard.
Yes, you can use the FRITZ!Box VPN connection on all common mobile devices, such as Apple IPhones or Android smartphones. I have described how this works above.
Not found the right one? Write a comment and let the community help you.
Conclusion
The FRITZ!Box VPN is a great thing if you want to access your home network while travelling. The VPN can be set up in a few simple steps and you can use it to access all network resources shared in the network, such as storage or media. Everything you could do at home.
What did you think of this post?
-
Pingback: Set up Security Camera Livestream on Raspberry Pi (with USB webcam)