Migrate WordPress Site without plugin: Step-by-Step Guide


")


Your WordPress site is getting a new domain or needs to move to another server? How to migrate your WordPress site manually without a plugin.
When moving a WordPress site to a new host or to a new domain, there are some important points that should be considered so that everything works properly later. But don’t worry: I’ll show you in this post step by step how to move WordPress manually to another server or domain.
In this tutorial you will learn how to do a complete WordPress server move or a WordPress domain move. You can also follow these steps if you want to make a copy of your WordPress site. Some steps can be skipped for some cases, I have described that in the first sentence of each chapter.
WordPress Migration: Why not use a plugin?
There are some WordPress plugins that are supposed to help you migrate your WordPress installation. But some are paid or do not work properly. Therefore, I find the manual migration of WordPress all the more interesting. Without a plugin, the move of your WordPress site is also quite easy to implement, and you always have full control over the entire process.
Step 1: Move files to new webspace
First we need to move all files to the new webspace of the new server. If you only want to change the domain of your WordPress site, you can skip this step.
Connect to your old webspace with an FTP client (e.g. WinSCP or FileZilla) and download all files locally to your computer, preferably to a new folder. This may take a few minutes depending on the size of the site and the number of images. You can recognize the WordPress directory by the fact that it contains files similar to the following screenshot.

For advanced users: If you have SSH access to your webspace, you can create a tgz archive there and download it. You can find the appropriate Linux commands here.
When everything is downloaded, you can connect to the new server’s webspace again via FTP and upload everything to the root directory there.
Now open the .htaccess file directly and replace your old URL (domain) with your new one if available.
If the .htaccess file is not displayed in WinSCP, you must first activate this option with CTRL+ALT+H.
Step 2: Adapt wp-config.php
The wp-config.php is located in the main directory of your website and is the central configuration. Here you must store the connection data to your new database if it is not identical to the old data. To do this, search for the following lines and adjust the data. The connection data will be provided to you by your hoster.
define( 'DB_NAME', '***' );
define( 'DB_USER', '***' );
define( 'DB_PASSWORD', '***' );
define( 'DB_HOST', 'localhost' );
You should also check whether these two lines are present in wp-config.php. If so, replace https://www.oldurl.com with your new URL.
define( 'WP_HOME', 'https://www.oldurl.com' );
define( 'WP_SITEURL', 'https://www.oldurl.com' );
Step 3: Move WordPress database
3.1 Export database
All data about pages, posts, etc. are stored in the database. This data must of course be moved. This step is not really necessary if you only want to change the WordPress domain, but I would still strongly recommend it to you, because this export also serves as a backup of your site.
For this we use the tool phpmyadmin, which you can download here. We simply put the unzipped folder into the main directory of the old site and can then access it via https://www.example.com/phpmyadmin and log in with the user data from the wp-config.php file.
In the next step we need to export the database. To do this, select your WordPress database and switch to the “Export” tab.
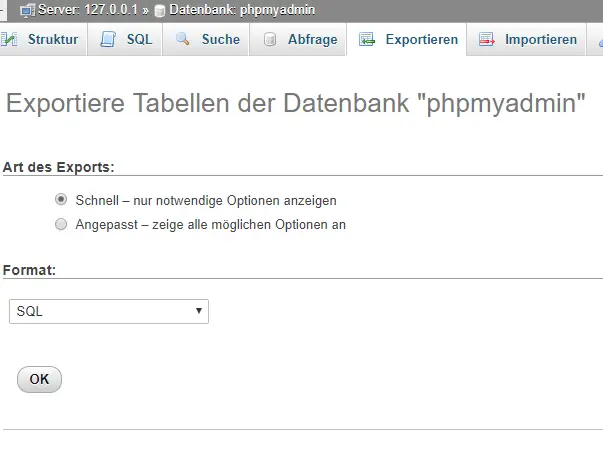
Type of export can remain on “Quick – show only necessary options” and format we also leave on “SQL”. With a click on “OK” we get a SQL file, which we download and upload in the new webspace.
3.2 Import database
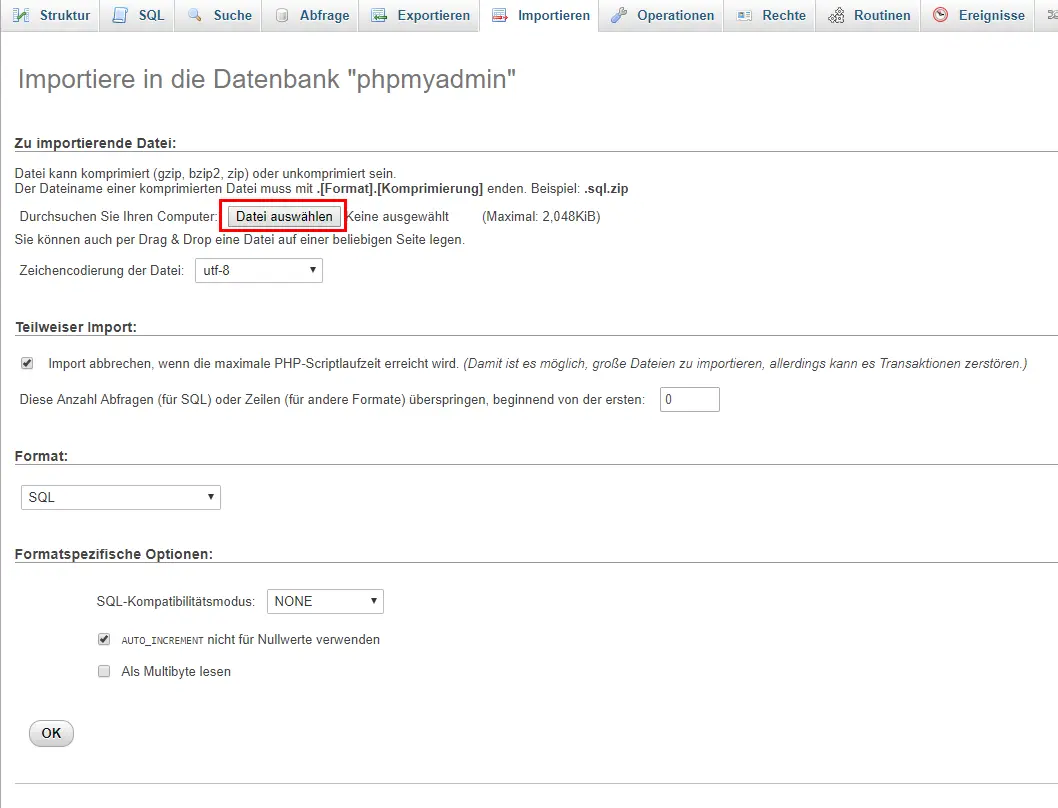
Now, who would have thought it, we need to re-import the file on the target server. For this we also put a phpmyadmin installation in the root directory of the new webspace. There we go to the “Import” tab and select our exported SQL file at “Select file”. We leave the rest of the settings as they are and click on “OK”.
And already we have the database and all WordPress files on the new server.
Step 4: WordPress domain rewrite in the database
This step is only necessary if your domain has changed. If your site has only moved to a new server, this step is not necessary.
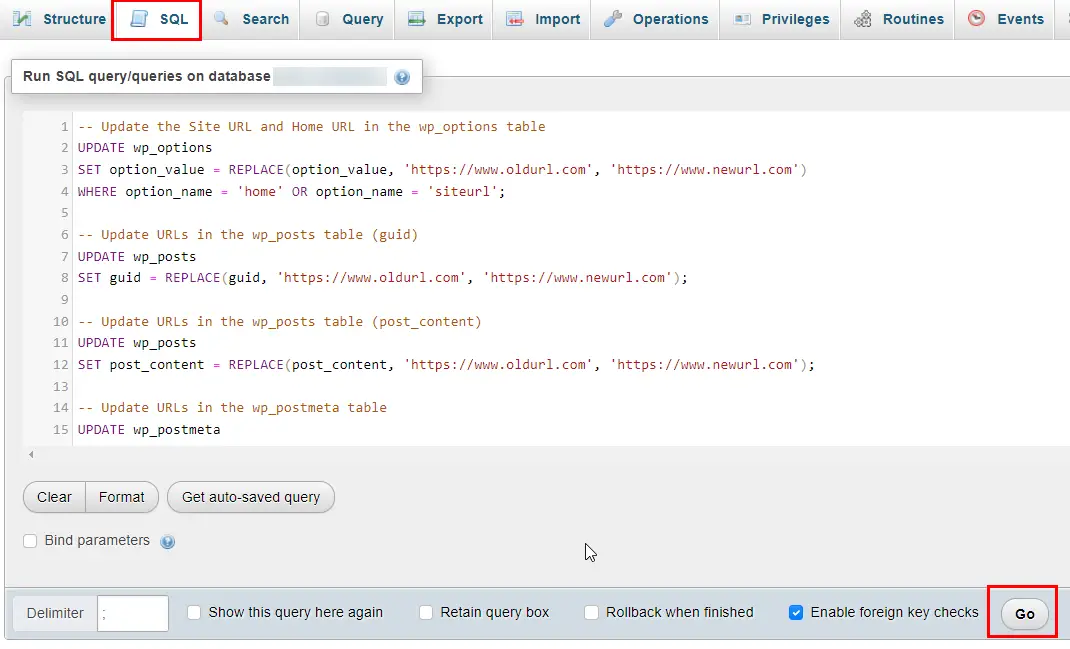
The URL of your website is stored in several places in the database. However, we can change these using a few SQL queries. To do this, copy the queries in the following code field and replace https://www.oldurl.com with your old URL and https://www.newurl.com with your new URL.
-- Update the Site URL and Home URL in the wp_options table
UPDATE wp_options
SET option_value = REPLACE(option_value, 'https://www.oldurl.com', 'https://www.newurl.com')
WHERE option_name = 'home' OR option_name = 'siteurl';

-- Update URLs in the wp_posts table (guid)
UPDATE wp_posts
SET guid = REPLACE(guid, 'https://www.oldurl.com', 'https://www.newurl.com');

-- Update URLs in the wp_posts table (post_content)
UPDATE wp_posts
SET post_content = REPLACE(post_content, 'https://www.oldurl.com', 'https://www.newurl.com');

-- Update URLs in the wp_postmeta table
UPDATE wp_postmeta
SET meta_value = REPLACE(meta_value, 'https://www.oldurl.com', 'https://www.newurl.com');

-- Update URLs in the wp_usermeta table
UPDATE wp_usermeta
SET meta_value = REPLACE(meta_value, 'https://www.oldurl.com', 'https://www.newurl.com');

-- Update URLs in the wp_links table (if used)
UPDATE wp_links
SET link_url = REPLACE(link_url, 'https://www.oldurl.com', 'https://www.newurl.com');

-- Update URLs in the wp_comments table (if URLs are present in comments)
UPDATE wp_comments
SET comment_content = REPLACE(comment_content, 'https://www.oldurl.com', 'https://www.newurl.com');

-- Update URLs in the wp_commentmeta table (if URLs are present in comment metadata)
UPDATE wp_commentmeta
SET meta_value = REPLACE(meta_value, 'https://www.oldurl.com', 'https://www.newurl.com');
If you have specified a table prefix other than the default wp_ in your wp-config.php, you must enter this accordingly in the queries. To check this, look for the following line in wp-config.php:
$table_prefix = 'wp_';
Once you have done this, you can paste the complete code into the “SQL” tab of phpmyadmin and execute it.
Attention: This will change data in the database. This action cannot be undone!
However, if something goes wrong, it is not a problem, because we can simply import the previous database export again.
Step 5: Adjust DNS settings and test page
If you have moved to another server, the IP of your webspace will have changed as well. Therefore, you have to change the A-record of your domain. Your hoster will be happy to provide you with the relevant information. To understand what is behind this, I can highly recommend my article on the basics of DNS.
Finally, you can check if you can reach your site again and the WordPress move was successful.
Important: The phpmyadmin folder in the root directory of your installation should now be deleted completely, so that no one can tamper with your database!
Conclusion
That’s it already! 🙂 Moving a WordPress site without a plugin should be doable with these instructions. If you have any problems, please feel free to write a comment.
If you want to tweak your freshly moved site a bit, you can check out these useful WordPress code snippets!
Please also post for automatic migration system for small WordPress websites.
If you want to “automate” the process, you need to use a plugin like All-in-One WP Migration. This guide is for a manual migration, but more possibilities 🙂
great sir beneficial article thanks for sharing.
Thanks for this.What I would also mention is that you should not install WordPress on the webspace of the new hosting.This could lead to a lot of errors if the WordPress version of the old webspace (which you ftp transfer) site is different that the version on the new webspace.
My all pages are ranked at 1st page and I want to move it but I am afraid of losing all SEO effort, can you guide me how to move without effecting it?
It’s important that you redirect every page with an 301 Redirect to the new page. So every ranked page must redirect to the same site on your new domain. It should be no URL with a 404 response.
As far as I know this is fine for Google. I have done this with several pages and never had any problems.
Thanks for this. What is the difference for migrating to new host (and domain)? Is there any difference in steps and instructions?
When you switch to a new hoster, you don’t necessarily change your domain. In this case, only DNS changes would have to be made and the WordPress installation could be transferred 1:1. Without the adjustments shown here. Does that answer your question? 🙂
I am searching on google how to migrate WordPress site to new domain and I find your post. Hopefully, now we can migrate website easily. Thank you!
Hope this post helps! If you have any questions feel free to contact me.