Using Ajax in WordPress: The right way


")


Using Ajax in WordPress makes perfect sense in many places. A better user experience and shorter loading times are often the goal. You can find out how to use Ajax correctly in WordPress in this tutorial.
What is Ajax?
Ajax stands for Asyncronous JavaScript and XML and describes a concept for asynchronous data transfer between a client (usually the web browser) and the web server.
This allows data to be exchanged without reloading the website. This technology is used in countless places on the Internet. Be it the sending of forms, dynamic reloading of articles (pagination is omitted) or suggestions of a live search.
In WordPress, you can of course create a standalone file and manually do the calling and processing. However, WordPress also provides a good and simple internal way to use Ajax in WordPress.
How to use Ajax in WordPress?
Step 1: Register JavaScript file
It should be known that CSS, as well as JavaScript files are registered in functions.php in the (child) theme. This looks like this:
// functions.php

function register_js_files() {
	wp_enqueue_script("my_ajax_script", get_template_directory_uri() . "/js/script.js");
}
add_action("wp_enqueue_scripts", "register_js_files");
The variables register_js_files, my_ajax_script and of course the path to your JavaScript file can still be adjusted. If you have already included a JavaScript file and it is suitable, you can of course also insert the program code there.
Step 2: Pass data from PHP to JavaScript file
Often we need server-side variables also in JavaScript. But also for this WordPress has a function wp_add_inline_script(). This function offers us the possibility to store any data in a JavaScript variable.
To do this, we add the marked lines to our function from step 1.
// functions.php

function register_js_files() {
  wp_enqueue_script("my_ajax_script", get_template_directory_uri() . "/js/script.js");
  wp_add_inline_script(
    "my_ajax_script",
    "const PHPVARS = " . json_encode(array(
        "ajaxurl" => admin_url("admin-ajax.php"),
        "another_var" => get_bloginfo("name")
    )),
    "before"
  );
}
add_action("wp_enqueue_scripts", "register_js_files");
The name my_ajax_script in line 4 and 6 must match. The constant PHPVARS you can choose freely again. It is the identifier for the access in JavaScript.
This script passes two variables into the JavaScript. Of course you can add more variables.
- ajaxurl: We need this variable in step 3, because the file path is necessary for processing the Ajax requests
- another_var: Sample transfer of the website title (but we do not need it any further)
Step 3: Send Ajax request to server
To save us programming work we use jQuery. Of course you can also implement the complete code with pure JavaScript.
Learn how to convert jQuery to JavaScript!
With a simple debug output, we can now view our PHP variables in the JavaScript i.e. JavaScript object:
console.log(PHPVARS);
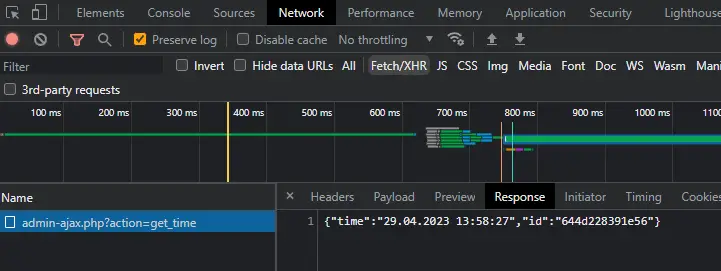
Something like https://example.org/wp-admin/admin-ajax.php should appear as ajaxurl. If so, you’ve done everything right so far. 🙂
Now follows the request to our Ajax script. When the call is executed depends of course on your purpose (e.g. click on a button).
let obj = {action: 'get_time'};

$.getJSON(PHPVARS.ajaxurl, obj, function(data) {
  console.log(data);
});
Important here is the action attribute, which is passed in an object to the request. This can be chosen freely and must be reused in the PHP code, so that WordPress knows which Ajax functionality should be called. In obj you can pass other properties, which you need on the server side.
I’m working with $.getJSON() here, but you can also use the $.post() or $.get() function.
Step 4: Program PHP functionality
We transfer the data that we send back to the client in JSON format (more about JSON with PHP and JavaScript). This gives us a simple and very convenient data format, which can be processed very easily in JavaScript.
We also implement the server-side code in our functions.php. But since I’m a big fan of order and structure in the code, I outsource the Ajax code to an additional file and include it in functions.php.
// functions.php

require_once(__DIR__ . "/ajax/get-time.php");
// ajax/get-time.php

<?php
add_action("wp_ajax_nopriv_get_time", "ajax_get_time");
add_action("wp_ajax_get_time", "ajax_get_time");

function ajax_get_time() {
    $time = date("d.m.Y H:i:s");
    $id = uniqid();

    $result = array(
        "time" => $time,
        "id" => $id
    );

    echo json_encode($result);
    die();
}
?>
This is our actual Ajax code. Here we need the action attribute from the JavaScript again. With this we hook two functions:
- wp_ajax_nopriv_YOUR_ACTION: Function that is executed when the caller is not logged in.
- wp_ajax_YOUR_ACTION: Function that is executed when the caller is logged in.
The function name ajax_get_time can be chosen freely again. The marked lines are replaced by the code you want to execute. At the end I return the data in JSON format (json_encode($result)) to the client. Note that at the end of the function you have to call die(); method to terminate.
Step 5: Process PHP data in JavaScript
In JavaScript, you get the data sent back to the client in the callback. These can be further processed as desired.
By using the getJSON() function we can directly access the properties of our JSON response:
let obj = { action: 'get_time' };
$.getJSON(PHPVARS.ajaxurl, obj, function (data) {
  console.log(data.id); // e.g. 644d23d89289a
  console.log(data.time); // e.g. 01.01.1970 14:04:08
});
Potential sources of error when using Ajax in WordPress
- The result of the Ajax request is always a “0”? Then either the corresponding server action is not found or you forgot
die();in your PHP script. - Are all components registered? Check in DevTools (F12 -> “Sources” tab) if your JS file and jQuery are loaded. To test if your JS file works you can add a console output to the place where the Ajax call should happen.
-
Pingback: Programming Real Time Charts & Graphs with JavaScript
-
Pingback: How to work with JSON in JavaScript and PHP